Accent color shots

Status
Not open for further replies.
When done sparingly, I think B&W with an accent color(s) can look great. Sometimes it can even make an utterly boring photo in color (like the second shot below), much more interesting. Here are a couple I've done over the last few years. Please post some of your own.

img_4522C.jpg


IMG_0360C.JPG


IMG_6367C.JPG


IMG_6377C.JPG


IMG_6517C.JPG
 
nicely done... If i may just add a little critique... I would try punching up contrast and working more with the black and white... When first shooting, they said a very good black and white (turned color) will make an awesome color photograph, but not all "color" photographs make good black and whites... so taking that little bit more and making the black and white more exciting and punchy could make a world of difference between good and superior accent photos. Keep it up.
 
Upvote 0
I always welcome critique, and I'd rather be told the truth, even if harsh.

I'm pretty sure I know which photos you were taking about, and what to do about them, but I would greatly appreciate a shot by shot analysis. Once again, tear them apart if needed, you won't hurt my feelings; and would be doing me a favor.
 
Upvote 0
A shot by shot comparison? This is just my 2 cents...

1) the boys- I think that if it wasn't red shorts, it would be kinda blah as far as contrast... I'm sure in color it was light blue water meet light skinned boys meets light blue sky... kinda tough.. I may try to burn the bottom water and top sky... especially around the right side boy... he's kinda getting lost tonality wise.

2) The boy sitting down... This is another tough one because the highlight of the photo is what is colorized. My eye wants to draw a balance of dark to light however with the colorized part being the highlight, it is tough to digest a bit... Perhaps just a touch of shadow recovery to take away all the dark would help... but dont overdo it..

3) Darkroom with 3 people... this is a very dark photo overall... It is so dark that the red almost looks fake because the brightness of the red doesn't match the brightness of the natural scene... Raising the brightness level or shadow recovery may help (for the subjects) but leave the dark layer to use for the background so it doesn't get too busy...

4) Bride and Groom?... This photo is muddy and the dark tux is getting lost... A light shadow recovery and possible dodging on the brides and groom (highlight areas and areas of contrast separation) just to add that bit of separation and the appearance of natural highlights.

5) couple dancing.... The womans dress, like the other photo, seems kinda disproportionate in brightness to what the natural scene looks like... kinda hits you like a sharp left hook... I'm thinking it works because it is dancing, i'm assuming you didn't have too much control of the ambient light not that you would want the ambient to be too much higher or else it could get muddy also... The woman kinda feels darker than the man (mans probably a lot closer to the flash)... if you do any shadow recovery (just a pinch) just to selectively bring up her exposure while leaving the rest of the photo alone may be my suggestion.
 
Upvote 0

thepancakeman

If at first you don't succeed, don't try skydiving
Aug 18, 2011
476
0
Minnesota
Here's one more I have. It's probably more color than just accent, but thought I'd throw it up here anyway as it's similar. Not totally happy with the blur as I was trying to create a motion effect but not necessarily linear, but none-the-less I think it's a great photo. I'm open to contrary opinions or suggestions on more "better" ways to create a sense of motion. ;)
 

Attachments

  • IMG_4270.jpg
    IMG_4270.jpg
    200.7 KB · Views: 1,371
Upvote 0
Kamera Obscura said:
Well, looks like she's effortlessly gliding along on ice. Based on her very relaxed look, no prob.....

So great shoot, no fix needed

Dario.

Relaxed look until she hits a rock and go flying off haha. =) Looks nice... FYI, regarding the motion blur, I saw somewhere when someone wanted 45 degree motion blur rather than side to side, they increased the canvas size, rotated to the direction of how they wanted the angle (so the motion blur would be horizontal) and then applied the motion blur, then rerotated it back to where it was. If that's the only thing you wanted to change and you still have it in layers, shouldn't take more than a few min.
 
Upvote 0

thepancakeman

If at first you don't succeed, don't try skydiving
Aug 18, 2011
476
0
Minnesota
That make sense to "line up" the background blur with the angle of the board--I may have to try that.

More of my concern is the "ghosting" around the kid herself which was a different step than the background blur. Without any sort of effect/blur it didn't look right, so I feel like what I have is an improvement over nothing, but it still feels a bit ackward.
 
Upvote 0
thepancakeman said:
That make sense to "line up" the background blur with the angle of the board--I may have to try that.

More of my concern is the "ghosting" around the kid herself which was a different step than the background blur. Without any sort of effect/blur it didn't look right, so I feel like what I have is an improvement over nothing, but it still feels a bit ackward.

Other than the background motion blur, it would help if you can explain what you would like to see in your minds eye (rather than the ghosting) and what filter you used for the ghosting so I can best (and the rest of the canon rumors forum) to advise you... If you are simply trying to convey motion, you could select the girl, put her on her on layer (if she's not already), make a duplicate, and on the lower layer you can apply motion blur. If you did that to the top layer she would be out of focus. Adjust the trail to your liking and then adjust the opacity of the layer to your liking. If it appears off you can either slightly adjust the top opacity to add a little blur to the subject or add a layer mask (with the girl selected so the mask is in the shape of the girl), do a gausian blur so the edges of the girl blends into the motion blur layer below... I hope this helps.
 
Upvote 0

tomscott

Photographer & Graphic Designer
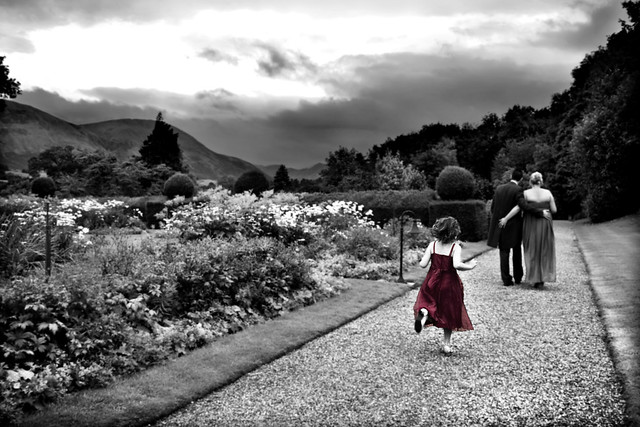
I would say i agree with other comments that the images need a little more B+W contrast. Also there is more to editing than this, simply adding the colour image and painting back the colour isnt enough for me. Its too obvious been done a million times and is far too bold, the lack of contrast in the B+W then the stark contrast of the colour is too intense.

A little advice, if you are shooting raw, process two versions of your images, one good colour, one good B+W, dont use the basic desaturate tools in PS, use the levels and the burn and dodge tool. Or go further and use layer masks. Depending on your ability, layer masks are alot more fluid painting the effect in with a softer brush at a lower opacity. But also once you have painted the effect in have you tried any blend modes? to try and make the effect a little less intense? overlay, screen etc and you can build up the effect by duplicating the layers. This will give you abit more of a fine art feel to the images and abit more velvety look rather than stark.

Tom Scott
 
Upvote 0
te4o said:
How do YOU guys do this, I had a long read about layers in Photoshop in those days and forgot about it as I don't have time right now to get involved in PS as much.

I use GIMP not photoshop, but it should translate, it's a really simple process.

Duplicate layer. Desaturate top layer. Adjust as necessary. Add layer mask to top layer. Using your tool of choice, paint black on the layer mask where ever you want the back layer to show through.
 
Upvote 0
Status
Not open for further replies.