I have the opportunity to pick up an original Canon 5D (mark 1 or classic) recently. The price was so so low and the camera was cosmetically very nice and it was working well. It even came with a Canon battery grip and 2 original batteries (seem holding charge quite okay) and the box and accessories. Everything was for only Cad 350. (equivalent US$270)
The camera has one problem- this old camera has no live view feature. The only way to view the target of the shooting is to look through the eyepiece. My eye sight is deteriorating badly due to age. When I checked before I bought, I did not realize that the eyepiece was very dirty inside with smudge/fungus/dust etc. I could see the view through it and it was slightly blurry. I thought it was my bad eye or the diopter needed adjusting.
When I took it out the day after, I discovered the thing and I used a flashlight to look into the eyepiece and found the disgusting smudge and it was disturbing because I have to face it every time I use it in the future. I then decided to proceed with my DIY repair attempt.
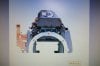
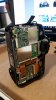
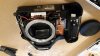
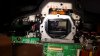
I have before opened up the same model camera to fix the weird polarized display of the rear LCD. So, I was not too worried about opening a DSLR. I found a 5D repair manual online and I followed the steps to disassemble the camera to the point that I can reach the eyepiece. Things went quite well. I was able to take out the eyepiece after
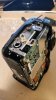
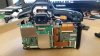
removing the back, side, front and top panels. Nothing stressful at all in the whole opening up procedure. I only have to be careful when removing the 2 flex cables to detach the rear panel from the PCB. (actually it's easy, just don't break the clips of the connectors)
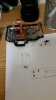
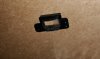
I used a cotton swap and alcohol to clean the eyepiece and the glass inside but it didn't work. I then mixed some ammonia and hydrogen peroxide (mixture solution for removing fungus in vintage lenses) and the smudge/fungus/dirt or whatever was gone after some rubbing. I allowed it to dry and then put everything back. The old camera was back to life with a crystal clear view through the eye piece.
A few pictures are taken during repair for sharing. If you have an old camera in your basement and have similar problem. Canon repair will not repair some older models and you don't want to spend a few hundred to recover it's life. Why not take it out and have fun DIY repair.
Thanks for viewing. Please share your DIY repair projects or experience.
The camera has one problem- this old camera has no live view feature. The only way to view the target of the shooting is to look through the eyepiece. My eye sight is deteriorating badly due to age. When I checked before I bought, I did not realize that the eyepiece was very dirty inside with smudge/fungus/dust etc. I could see the view through it and it was slightly blurry. I thought it was my bad eye or the diopter needed adjusting.
When I took it out the day after, I discovered the thing and I used a flashlight to look into the eyepiece and found the disgusting smudge and it was disturbing because I have to face it every time I use it in the future. I then decided to proceed with my DIY repair attempt.
I have before opened up the same model camera to fix the weird polarized display of the rear LCD. So, I was not too worried about opening a DSLR. I found a 5D repair manual online and I followed the steps to disassemble the camera to the point that I can reach the eyepiece. Things went quite well. I was able to take out the eyepiece after
removing the back, side, front and top panels. Nothing stressful at all in the whole opening up procedure. I only have to be careful when removing the 2 flex cables to detach the rear panel from the PCB. (actually it's easy, just don't break the clips of the connectors)
I used a cotton swap and alcohol to clean the eyepiece and the glass inside but it didn't work. I then mixed some ammonia and hydrogen peroxide (mixture solution for removing fungus in vintage lenses) and the smudge/fungus/dirt or whatever was gone after some rubbing. I allowed it to dry and then put everything back. The old camera was back to life with a crystal clear view through the eye piece.
A few pictures are taken during repair for sharing. If you have an old camera in your basement and have similar problem. Canon repair will not repair some older models and you don't want to spend a few hundred to recover it's life. Why not take it out and have fun DIY repair.
Thanks for viewing. Please share your DIY repair projects or experience.
")