I do video fusion and color grading with blockbuster look is popular in video. See below my simple workflow to achieve the effect in PS.
If anyone has other way I would gladly learn another technique.
1 - I start with my standard post in ACR/Lightroom and bring the photo to PS.
2 - I do all standard facial retouching.
3 - From the adjustment layer tools, I use color balance with these parameters
Highlights : 0, -6, -13
Midtone : 0, 0, 0
Shadow: -18, -3, +3
The idea is to increase the orange in the highlights and the teal in the shadow.
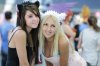
Often, the subject has a dominant color (clothing, hair, eyes. etc) then I use the oposite of that color in the midtones. Example, during Otakuthon (cosplay) girls color their hairs.
To find the oposite color, create a blank layer, edit+fill, background color, and with the cursor choose the color the oposite you want to find, then press ctrl+i. I don't have a way to find the RGB value for that color so I try to guess it by tweaking the sliders. If it is too complicated to find it then I use a different technique, which is by keeping the layers I just filled in, change the blending mode to color, create a mask, fill with black and with a soft white brush, 3%, I paint it on the portion I want to fill with it.
The value above is for starter. I usually tweak them a bit depending on the photos. I created an Action for it and I always start from there. The final result is up to your taste.
You can add as well HSL to boost the color you want to accentuate.
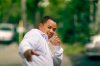
To show an example see attachement below.
Please do not use the photo outside of CR. This is my friend Hery trying to kick my camera.
Thanks,
If anyone has other way I would gladly learn another technique.
1 - I start with my standard post in ACR/Lightroom and bring the photo to PS.
2 - I do all standard facial retouching.
3 - From the adjustment layer tools, I use color balance with these parameters
Highlights : 0, -6, -13
Midtone : 0, 0, 0
Shadow: -18, -3, +3
The idea is to increase the orange in the highlights and the teal in the shadow.
Often, the subject has a dominant color (clothing, hair, eyes. etc) then I use the oposite of that color in the midtones. Example, during Otakuthon (cosplay) girls color their hairs.
To find the oposite color, create a blank layer, edit+fill, background color, and with the cursor choose the color the oposite you want to find, then press ctrl+i. I don't have a way to find the RGB value for that color so I try to guess it by tweaking the sliders. If it is too complicated to find it then I use a different technique, which is by keeping the layers I just filled in, change the blending mode to color, create a mask, fill with black and with a soft white brush, 3%, I paint it on the portion I want to fill with it.
The value above is for starter. I usually tweak them a bit depending on the photos. I created an Action for it and I always start from there. The final result is up to your taste.
You can add as well HSL to boost the color you want to accentuate.
To show an example see attachement below.
Please do not use the photo outside of CR. This is my friend Hery trying to kick my camera.
Thanks,