How do I solve this issue?

Status
Not open for further replies.

candyman

R6, R8, M6 II, M5
Sep 27, 2011
2,288
231
www.flickr.com
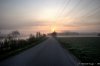
See attached a photo which is a merge of a 5 shot exposure.
Also attached a detail in which you can see spots. Down left from the electricity mast and on the trees on the otherside of the road. It looks some kind of flare from the sun that is present in each of the 5 exposure shots. After I merged the 5 photos to one, it only became more visible.

Any idea how to get rid of it? Looks like I need to do that in each of the 5 exposures. Or it isn't possible?
I do not have Photoshop but only LR6 and DxO Optics Elite v10.
 

Attachments

  • 2015_04_24_5 shot exposure_LR1 -.jpg
    2015_04_24_5 shot exposure_LR1 -.jpg
    2.1 MB · Views: 295
  • detail.jpg
    detail.jpg
    230.4 KB · Views: 1,037

candyman

R6, R8, M6 II, M5
Sep 27, 2011
2,288
231
www.flickr.com
climber said:
And here is one option how to avoid flares: https://www.youtube.com/watch?v=TSF2k1r-7w0


Thanks. I watched the explanation of Jimmy carefully.
Two things:
1. I did not take an exposure where my finger hides the sun (I have 5 exposures with sun :-\ ). I may do that next time.
2. I don't have PS. I wasn't planning to invest in that. But if PS is the only tool where you can some more advanced stuff, maybe I have to reconsider.
I must say, maybe I am to much focussed on it as to you it seems barely visible. It just bothers me.
 
Upvote 0

candyman

R6, R8, M6 II, M5
Sep 27, 2011
2,288
231
www.flickr.com
Halfrack said:
I'm not seeing what you're seeing - if you have LR6, do you still have LR5.5 to look at? Does it show in DPP as well? I take it other shots don't show the issue.
Yes it is visible on each of the 5 exposures in DPP4.
I am actually just a little surprised. I did not expect such flare with the 16-35L f/4 IS. The sun wasn't too bright either at 6:30 AM
 
Upvote 0
Yes, if you want to go that way with a finger, you can't do anything on that image. Also you must have your camera on a tripod when shooting. And if you did a sequence of 5 shots for doing HDR later, now you have to do another sequence with finger over the sun. But you have to use manual (M) mode, otherwise, when you cover the sun, the camera will expose differently (because of less light). So, 2 exactly the same sequences, only the second one has the sun covered.

The problem could be solved also with other tools like Clone stamp tool in Photoshop. But the healing brush tool in Lightroom unfortunately isn't that good.

Shooting direct to the sun is always problematic. I use 24-70, 2.8 mk2 and 70-200, 2.8 mk2 and always get some (smaller or bigger) flares when shooting toward the sun.
 
Upvote 0
Frankly, I do not think the lens flare detracts from the shot at all. In fact as others have said is barely visible. Additionally, I think that lens flare actually add a bit of drama to a shot; of course in this case it is too minor and hidden to add to the shot.

If it bothers you that much you can try the spot removal tool in LR. You may need to play around with whether you heal or clone and what spot the tool uses as the source for the replacement.
 
Upvote 0
this is how to remove the reddish sunflare in LR:

1. select the brush tool and adjust the brush size so that it appropriately covers the reddish area. make sure all the sliders are dialed to zero. make sure you have a decent feather to the brush and dial back the flow to around 50.

2. brush over the reddish area to create a mask. below the image area you can tick the "Show Selected Mask Overlay" box to see the area being masked as you do it. once you have an appropriate mask, deselect "Show Selected Mask Overlay" so that you can see the image area as it appears.

3. look at the bottom of the brush adjustments and find the box next to "Color". click on that box to bring up the color selection interface where you can then select a color to be applied to the mask.

4. since the flare is reddish in color you want to select red's compliment color which is cyan. use the eye dropper to find the color most appropriate. at the bottom right of the panel find the slider that allows you to dial in the % of color you need and watch the image area until you see the red area go to a more neutral color.

you may have to create another mask if you find that you need to add some warmth back into that area. but that should cleanly and effectively remove the sunflare from the image.

post your results!
 
Upvote 0
agierke said:
this is how to remove the reddish sunflare in LR:

1. select the brush tool and adjust the brush size so that it appropriately covers the reddish area. make sure all the sliders are dialed to zero. make sure you have a decent feather to the brush and dial back the flow to around 50.

2. brush over the reddish area to create a mask. below the image area you can tick the "Show Selected Mask Overlay" box to see the area being masked as you do it. once you have an appropriate mask, deselect "Show Selected Mask Overlay" so that you can see the image area as it appears.

3. look at the bottom of the brush adjustments and find the box next to "Color". click on that box to bring up the color selection interface where you can then select a color to be applied to the mask.

4. since the flare is reddish in color you want to select red's compliment color which is cyan. use the eye dropper to find the color most appropriate. at the bottom right of the panel find the slider that allows you to dial in the % of color you need and watch the image area until you see the red area go to a more neutral color.

you may have to create another mask if you find that you need to add some warmth back into that area. but that should cleanly and effectively remove the sunflare from the image.

post your results!

though i solved it in another way, this way is better, for the color try the values H:175 S:16
 

Attachments

  • 20150424-2015_04_24_5 shot exposure_LR1 -.jpg
    20150424-2015_04_24_5 shot exposure_LR1 -.jpg
    2.3 MB · Views: 249
Upvote 0

candyman

R6, R8, M6 II, M5
Sep 27, 2011
2,288
231
www.flickr.com
agierke said:
this is how to remove the reddish sunflare in LR:

1. select the brush tool and adjust the brush size so that it appropriately covers the reddish area. make sure all the sliders are dialed to zero. make sure you have a decent feather to the brush and dial back the flow to around 50.

2. brush over the reddish area to create a mask. below the image area you can tick the "Show Selected Mask Overlay" box to see the area being masked as you do it. once you have an appropriate mask, deselect "Show Selected Mask Overlay" so that you can see the image area as it appears.

3. look at the bottom of the brush adjustments and find the box next to "Color". click on that box to bring up the color selection interface where you can then select a color to be applied to the mask.

4. since the flare is reddish in color you want to select red's compliment color which is cyan. use the eye dropper to find the color most appropriate. at the bottom right of the panel find the slider that allows you to dial in the % of color you need and watch the image area until you see the red area go to a more neutral color.

you may have to create another mask if you find that you need to add some warmth back into that area. but that should cleanly and effectively remove the sunflare from the image.

post your results!


Thanks voor this explanation.
I tried to work on it but still not sure if it is good enough. See the result.
 

Attachments

  • 2015_04_24_LR2.jpg
    2015_04_24_LR2.jpg
    1.3 MB · Views: 252
Upvote 0
Status
Not open for further replies.