One of my friends, who is a real estate agent, asked for my help this past weekend to photograph a new listing that she has. I'm not much of a "real estate" photographer, but I told her that I would help her our free of charge for the opportunity to learn. I'd like to ask the professional real estate photographers to provide a critique of my first attempt so I can grow as a photographer.
I made use of my T1i, 17-55, and 10-22 to take the photographs. I also used 2 x 430EX II's and an ST-E2 to provide fill light. Now, I received my second 430EX and ST-E2 2 days before I was to shoot this home, so I had effectively zero learning time. My friend was good with me experimenting with my setup and understood that she wasn't getting "professional" level shots, but I thought that they were good enough for an MLS listing.
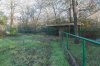
The house on the other hand was not a very attractive house and had been vacated. I was hoping to be able to stage the home a bit, but this is what I had to work with. Just to give you an idea, the agent even told me that it was okay for me to not take a picture of the front of the home because of the over grown foliage and ugly front door. Therefore, I did as she asked and skipped the front of the home.
From my first experience, here's what I learned:
1. My tripod absolutely sucks - I got a sunpack tripod as a gift and found it to be a pain to set up and adjust. I don't normally use my tripod for my other photography so I never really noticed it's short comings. If I start doing this a little more, I'll change that out. I should have at least brought my monopod, but all of my shots are hand held.
2. I should not have messed with the speed light transmitter and just dealt with the single flash. Now granted, I did get it to work, even around corners and I felt I did a decent job for my first time setting flashes manually, but I needed to be comfortable with that setup before I do that again. I wasted a lot of time with on the job training.
3. Radio triggers are the way to go. At work, my company replaced part of their bonus program with a points program that you could use to purchase items from an awards website. Luckily they had some canon gear on there. I was looking for something that I normally wouldn't buy for myself and I had my eyes set on a canon ring light. When I went to go get it, it had been removed from the options, so I opted to get a second flash and the speedlight transmitter. They did not have the RT options available or I would have started down that path. Though this will work for what I intended to use it for (simple home studio for kid portraits), it's got some problems with real estate photography. I do know that the best solution is radio triggers, but I didn't have any at the time of my appointment.
4. Bring shoes that are water proof. In the early morning I went out across the property to take some landscape pictures of the property (5 acres). My shoes were soaked in 5 minutes.
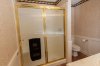
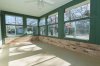
5. Expose for the windows and fill in with flash. I thought my room shots with windows worked out okay by doing this.
6. White balance can be a bitch when every other light in the home is soft white, bright white, fluorescent, warm white, etc. I edited in lightroom to the best of my ability. I think I got the pictures relatively consistent on white balance across the home, but it took me half a day in lightroom to fine tune them.
7. when using wide angle lenses, you'd better learn perspective correction, or at least make the center lines vertical in your pictures. I understand that tilt shift lenses work great for this, but I don't have one and wasn't going to purchase or rent one for this one time affair. I did not do a good job on this in my post process, but will work to improve my techniques. I ran out of time and had to deliver what I had.
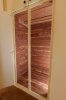
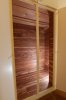
8. be better prepared to remove distracting objects, or find ways to hide them. It's easier to hide them when there is actually something in the house. In my case, it was the lazy wiring job the folks did to distribute tv cable from their closets to the bedrooms.
So this learning experience was invaluable to me. I delivered the pictures to the agent on time and she showed other team members of the agency. She said that the feedback from them was positive, so I may get additional paid work, but who knows.
If you have a moment, could you please provide some constructive criticism on my work?
Thanks!
Wes
I made use of my T1i, 17-55, and 10-22 to take the photographs. I also used 2 x 430EX II's and an ST-E2 to provide fill light. Now, I received my second 430EX and ST-E2 2 days before I was to shoot this home, so I had effectively zero learning time. My friend was good with me experimenting with my setup and understood that she wasn't getting "professional" level shots, but I thought that they were good enough for an MLS listing.
The house on the other hand was not a very attractive house and had been vacated. I was hoping to be able to stage the home a bit, but this is what I had to work with. Just to give you an idea, the agent even told me that it was okay for me to not take a picture of the front of the home because of the over grown foliage and ugly front door. Therefore, I did as she asked and skipped the front of the home.
From my first experience, here's what I learned:
1. My tripod absolutely sucks - I got a sunpack tripod as a gift and found it to be a pain to set up and adjust. I don't normally use my tripod for my other photography so I never really noticed it's short comings. If I start doing this a little more, I'll change that out. I should have at least brought my monopod, but all of my shots are hand held.
2. I should not have messed with the speed light transmitter and just dealt with the single flash. Now granted, I did get it to work, even around corners and I felt I did a decent job for my first time setting flashes manually, but I needed to be comfortable with that setup before I do that again. I wasted a lot of time with on the job training.
3. Radio triggers are the way to go. At work, my company replaced part of their bonus program with a points program that you could use to purchase items from an awards website. Luckily they had some canon gear on there. I was looking for something that I normally wouldn't buy for myself and I had my eyes set on a canon ring light. When I went to go get it, it had been removed from the options, so I opted to get a second flash and the speedlight transmitter. They did not have the RT options available or I would have started down that path. Though this will work for what I intended to use it for (simple home studio for kid portraits), it's got some problems with real estate photography. I do know that the best solution is radio triggers, but I didn't have any at the time of my appointment.
4. Bring shoes that are water proof. In the early morning I went out across the property to take some landscape pictures of the property (5 acres). My shoes were soaked in 5 minutes.
5. Expose for the windows and fill in with flash. I thought my room shots with windows worked out okay by doing this.
6. White balance can be a bitch when every other light in the home is soft white, bright white, fluorescent, warm white, etc. I edited in lightroom to the best of my ability. I think I got the pictures relatively consistent on white balance across the home, but it took me half a day in lightroom to fine tune them.
7. when using wide angle lenses, you'd better learn perspective correction, or at least make the center lines vertical in your pictures. I understand that tilt shift lenses work great for this, but I don't have one and wasn't going to purchase or rent one for this one time affair. I did not do a good job on this in my post process, but will work to improve my techniques. I ran out of time and had to deliver what I had.
8. be better prepared to remove distracting objects, or find ways to hide them. It's easier to hide them when there is actually something in the house. In my case, it was the lazy wiring job the folks did to distribute tv cable from their closets to the bedrooms.
So this learning experience was invaluable to me. I delivered the pictures to the agent on time and she showed other team members of the agency. She said that the feedback from them was positive, so I may get additional paid work, but who knows.
If you have a moment, could you please provide some constructive criticism on my work?
Thanks!
Wes


")