T
Tijn
Guest
Hey all,
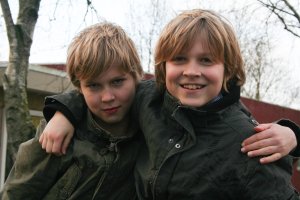
I've been trying to recover a picture that I took two months ago with my old 350D camera. I "grew" a lot since then, mainly due to reading up on stuff before buying and the actual owning of my camera upgrade (my current 60D). There's a lot of critical things to say about this picture. Among other things it was taken with a kit lens in "P" mode without paying much attention to which aperture/shutter combination it picked. For this particular shot, that happened to be f/11 and a 1/200 second shutter time (I'd have chosen a wider aperture if I were to take that shot again today). It was also shot in JPG. But worst of all, the "P" mode wasn't the only thing I wasn't paying attention to; the picture was shot at -2 EV exposure compensation bias (I set it to that the night before, trying to photograph sparks). But I was there, and I did take that picture, and I've come to really like it a lot having seen how close I can get to "rescuing" it. The boys in the picture aren't my own, by the way, I'm too young to have kids in that age range - but they're very dear to me.
Now with the arrival my new camera I've learned the value of post-processing, as it was the first time I started using Lightroom 3. In a short time I've "grown" a lot in Lightroom as well. My understanding of its options has grown to a respectable level and I got a different "eye" looking for possible improvements on pictures I've taken earlier. This is a dynamic process, and probably in 2 months time I'll be seeing different things that I'm overlooking now - but as long as I'm growing, it's all good.
On this particular picture, I'm trying to recover it up to the point that I can look at it and see a natural, good-looking picture. What I like about lightroom is that you can make some changes, leave the picture be, and then come back to it later and fiddle around some more. For many pictures, that has had the effect that I am satisfied with it when I stop fiddling, but then when I come back to it after looking at other pictures (in a different 'context'), I see some new things that I want to tweak. For most of my pictures these "tweak sessions" occur at most 3 or 4 times. For this particular picture however, I keep being dissatisfied, and I've been fiddling around with for well over 20 iterations. As I work on it more, there's also the risk of visible over-processing.
With my current result, I'm more or less happy right now - it's more or less natural looking to me. A little bit dark still, though I think I like that; but I'm not sure about the skin tones (but also don't know what to improve, or how, without just making it worse). I currently keep running in circles (too dark - brighten it up - colours too unnatural - tweak colours - still too unnatural - tweak contrast - darken a bit - fine for now; come back later: too dark again...)
Could some of you please look at this picture and tell me if you see any "points of improvement" that I'm currently overlooking? Slightly off (skin?) colours, problematic contrasts, too dark/bright, etcetera? If you could give your opinions, and perhaps some directions to help finish this picture, I'd be very grateful. I've included both the "before" and "after" (current) versions in this post.
If you tell me that the colours are unfixable, that's fine by me, too. Should have shot RAW and at different settings/correct exposure, but didn't. Too bad. If you think the picture is fine as is, that's welcome feedback also.
Thanks in advance!


")