Basic Workflow?

Greetings all,

I am a 60D owner and use a Mac Laptop.

I use Magic Bullet Grinder to turn my files into ProRes LT (with 1080p proxie files) but not sure exactly how to use these files in FCPX.

There are some stunning videos done in post production with the same equipment.

Was curious on a simpler linear (step 1,2,3,4) process from importing video, converting it, using proxies, adding effects/corrections, exporting for both DVD & Vimeo/YouTube.

Thanks in advance (yes i used google but have yet to find a clear coherent and simple linear workflow process)

Best,

Jason
 

cayenne

CR Pro
Mar 28, 2012
2,866
795
jasonmillard81 said:
Greetings all,

I am a 60D owner and use a Mac Laptop.

I use Magic Bullet Grinder to turn my files into ProRes LT (with 1080p proxie files) but not sure exactly how to use these files in FCPX.

There are some stunning videos done in post production with the same equipment.

Was curious on a simpler linear (step 1,2,3,4) process from importing video, converting it, using proxies, adding effects/corrections, exporting for both DVD & Vimeo/YouTube.

Thanks in advance (yes i used google but have yet to find a clear coherent and simple linear workflow process)

Best,

Jason
Why not just import your files directly with FCPX? That's what I'm doing with my 5D3...it will import directly, and you can put into whatever format you wish to work with...

Start with that. I'm a noob myself, but I import in directly into FCPX...do my editing...once that is basically done, I start looking for any color correction needed (I'm learning this too), I then usually go through and listen to see what type of audio adjustments, voiceovers, etc it might need...then I usually export full HD. When posting to YouTube, I do it through YT's interface, point it to the HD version on my filesystem and let it import it in as they need it for HD. I'd assume Vimeo would be similar?

I'm learning a LOT from YouTube tutorials on all aspects of it...I was trying in my last one, to use split screens, etc...(posted that yesterday on this section of the forum)....
 
Upvote 0
May 12, 2011
1,386
1
cayenne said:
Why not just import your files directly with FCPX? That's what I'm doing with my 5D3...it will import directly, and you can put into whatever format you wish to work with...

Start with that. I'm a noob myself, but I import in directly into FCPX...do my editing...once that is basically done, I start looking for any color correction needed (I'm learning this too)

So you did listen? ;) Glad everything is working out for you and you're getting lots of good practice.

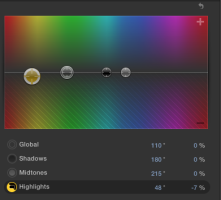
As for color correction, just remember less is more, you barely have to move the sliders at all to make an impact. Color Correction is super easy in FCPX. The color tab under your color corrections has 4 sliders, the first is global, the 2nd is shadows, 3rd is mid tones, and 4th is highlights. So if for instance you white balance were off and your image was a little too warm (yellow) you would need to subtract yellow (or add blue). So you can just take the highlights slider and drag it over to the yellow area to the left and pull it slightly under the line (see screenshot). If you look down at "highlights" under the color board, you'll see a circle with a square in the middle, which indicates that you are subtracting yellow from the highlights. If you pull the slider above the line, the highlights will have a circle next to it that is split diagonally that's half solid yellow, which indicates you are adding yellow. So it's very simple and visual, to add more of any color on the board, go to it and slide up above the line, to subtract pull down. Honestly with DSLR's (esp the 5DIII) the colors are so accurate that the majority of the time simple white balance/exposure adjustments are all that's necessary.

I'd go into tweaking exposure but that's a little more straightforward, color is what messes with people. Also, never try to color correct within 15 minutes of coming back indoors from bright sunlight, everything will look off and an hour later you'll see it and wonder what the hell your were thinking ;D

Disclaimer: This is in regards to getting the image as true to color/accurate as it was originally, for stylizing you can pull away at all of the color sliders and do whatever you want.
 

Attachments

  • Screen Shot 2012-08-09 at 11.29.28 PM.png
    Screen Shot 2012-08-09 at 11.29.28 PM.png
    68.1 KB · Views: 750
Upvote 0
May 12, 2011
1,386
1
jasonmillard81 said:
Greetings all,

There are some stunning videos done in post production with the same equipment.

Was curious on a simpler linear (step 1,2,3,4) process from importing video, converting it, using proxies, adding effects/corrections, exporting for both DVD & Vimeo/YouTube.

Thanks in advance (yes i used google but have yet to find a clear coherent and simple linear workflow process)

Best,

Jason

Try not to rely on post too much, you want to get the image as close as you can to what you want while you're shooting. Lighting is everything and regardless of how much post you put in bad lighting can ruin any camera's image.

I'll give you your process, and this is coming from someone that has edited almost 300 music vids in the last year alone.

Here's what to do:
1. Go under your preferences and uncheck "create optimized media" and "copy media to final cut events folder," all that does is waste a lot of space, work with your files from their existing locations.
2.. Import files STRAIGHT from CF/SD card, no compressor, FCPX supports H.264 natively and I've done tons and tons of tests, the advantages to transcoding all that stuff to prores are absolutely minimal and in terms of image quality virtually nonexistent.
3. Organize your footage
4. Edit away
5. Final cut will default to Prores422 after you drop the footage in, and after you're done editing just hit CMD+E and export with current settings.
6. Compressor > Modify the 1080p Video Sharing preset and under the settings change "restrict the data rate" to 6000kbps, Keyframes: Automatic, and "optimized for streaming."
7. Upload to Vimeo, easy as that. The no transcoding initially makes things a lot easier.

Also, for step 6 you may want to go 720p, I only go 1080p because I have 500 videos and use Vimeo as storage for H.264 versions of them.
 
Upvote 0