You are using an out of date browser. It may not display this or other websites correctly.
You should upgrade or use an alternative browser.
You should upgrade or use an alternative browser.
Stars above.
- Thread starter Mr Bean
- Start date
emag said:pbase(dot)com(slash)emagowan(slash)processing
I'm soooo gonna try that, cool tips/ideas!
Upvote
0
(Dumb) Question anyone. How does the movement of the stars and planets and moon relate wrt. photography?
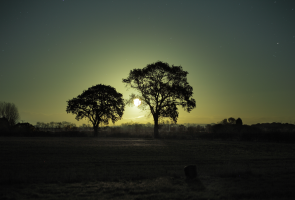
Is there any way of combining the landscape stationary with tracked stars?
Jack
Is there any way of combining the landscape stationary with tracked stars?
Jack
Upvote
0
dcm, those were great links for finding Polaris but I'm still a little uncertain about locating it on my circle in the alignment telescope of the iOptron tracker. I'm also wondering just how critical it is to place, like how long would exposures be where the lack of perfect alignment would show?
Jack
Jack
Upvote
0
Jack Douglas said:dcm, those were great links for finding Polaris but I'm still a little uncertain about locating it on my circle in the alignment telescope of the iOptron tracker. I'm also wondering just how critical it is to place, like how long would exposures be where the lack of perfect alignment would show?
Jack
Jack if you got the polar scope with the ioptron you can use stellarium and turn on "show equatorial grid" then zoom in on Polaris this will show you where on the circle Polaris should be, but you need to check your polar scope frist to see if the image is mirrored and or flipped ( do this in daylight) that way you will know if you need to set Polaris mirrored and or flipped . confused Yet ? You said you are handy, making a mount for the ioptrom (worm and gears ) that will let you make small adjustments to the horizon and latitude will greatly simplify setting up. The better the alignment the longer the exposure and the deeper you can go. The nice thing about the 6D (from what I've heard) iso 3200 should be usable, at least to start, take a few long exposures say 1,2,3 min ea look at your trailing. say you were at iso 400 and trailing was starting to show at 2 min , bump up to 800 and shoot 1 min. get something to play with and work on getting a better alignment next time. For the most part (other than comets , etc.) These things will be there forever but you wont and once you are hooked you will find good skies less common than you think, I know on average its cloudy the same amount but it seems to be more now that I pay closer attention to it.
Upvote
0
Jack Douglas said:dcm, those were great links for finding Polaris but I'm still a little uncertain about locating it on my circle in the alignment telescope of the iOptron tracker. I'm also wondering just how critical it is to place, like how long would exposures be where the lack of perfect alignment would show?
Jack
The Vixen Polarie has similar aiming mechanisms. A small sight hole or a optional scope you can insert for more precise alignment. The site hole method wasn't very accurate in my experience so I prefer to use the scope for final alignment. I start with the two eye method using the site hole to get me in the ball park, with one eye looking through the site hole and the other eye unobstructed. Searching for Polaris through the scope doesn't work very well. It takes a little practice but I can usually get Polaris in the site hole without too much trouble. Then I use the scope to fine tune my aim. The Vixen scope is a bit different, with dials to set date/time/meridian on the scope - no app needed. The iOptron scope and phone app use a different approach - you adjust have to figure out where to place Polaris in the view on the scope based on angle and radius. Page 9 of the manual had a pretty good description - I think I could work with it. Is there something else I'm missing.
Upvote
0
Thanks dcm, Although I'm not a dummy in general (don't ask my wife though), I'm coming to this topic with total ignoarance so even the terminology is confusing, but I think I've just about got it. I've just reread page 9 and where I got off track is that the app I downloaded to my computer was displaying the location of Polaris on the circle quite in contradiction to the printed page that showed the big dipper and suggested holding the page to match the sky and then placing Polaris on the center of the three circles, accordingly.
The shots I took apparently had Polaris fairly close based on the printed page big dipper. The app would have had me placing Polaris far from that but again my question is, as long as you've got Polaris into the region of the inner three circles is it that critical?? Would I see significant trails in 30 seconds?
Unfortunately it's too cold to just stand out there and fool around!")
Jack
The shots I took apparently had Polaris fairly close based on the printed page big dipper. The app would have had me placing Polaris far from that but again my question is, as long as you've got Polaris into the region of the inner three circles is it that critical?? Would I see significant trails in 30 seconds?
Unfortunately it's too cold to just stand out there and fool around!
Jack
Upvote
0
The location of the green dot/plus changes. The position (10h24.1m, r=40.8min) illustrated in the manual is for the lat/lon/time given - NW of Boston. Yours will likely be different.
Getting Polaris to the right h/m/r will give you more accurate tracking and allow longer exposures. Just getting it on the screen is a pretty good start and probably about as well as people that buy the low end version without the scope are able to achieve or building a barn door tracker. I'd expect slight elongation/oval if you don't get the tracking axis aligned properly.
The Vixen Polarie seems to use the same type mechanism. The manual is a bit better and provides maximum shutter speed for different focal lengths and drive speeds on page 19 and 20. You might use this as a guideline.
http://www.vixenoptics.com/PDF/POLARIE%20Manual.pdf
If you have a north facing window with a clear view of Polaris, you can test this out indoors without freezing to death. Aim your tracking unit at Polaris and then setup the camera aimed at Polaris as well. if everything is working you shouldn't see the normal circular star trails and the stars should stay pinpoints. Try decreasing the shutter speed until it does. You'll probably need a remote like the TC-80N3 to do this. I may have to try this myself.
Upvote
0
Have fun. I got mine in the summer so the weather was a bit nicer to practice. But I did have to stay up later to get dark skies -_-
Upvote
0
charlesbanke
17 year old doing what he loves

Upvote
0
To all,
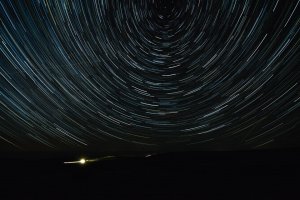
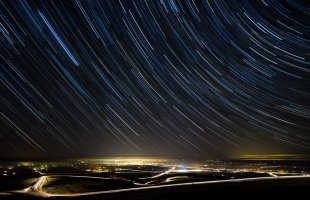
Here's my first and second attempt at star trails. In my first attempt, I made the mistake of too short of an exposure. It would generally be somewhat light polluted near Battle Mountain, but fog and low cloud had enveloped the lower terrain blocking out all the light pollution coming from the Columbia Basin. My exposures should have been two minutes, but they were only 20 seconds. On my second attempt, I raised my exposure to one minute since it was the longest I could go without blowing out the illuminated fog below over Pendleton, Oregon. I believe it's a better attempt than the first, but still room for improvement. A couple of vehicles went by and down Emigrant Hill during a couple of the exposures. I'm not quite sure if the illuminated foreground hurts or helps the image. What are your thoughts?
Thanks for looking,
Wade
Here's my first and second attempt at star trails. In my first attempt, I made the mistake of too short of an exposure. It would generally be somewhat light polluted near Battle Mountain, but fog and low cloud had enveloped the lower terrain blocking out all the light pollution coming from the Columbia Basin. My exposures should have been two minutes, but they were only 20 seconds.
On my second attempt, I raised my exposure to one minute since it was the longest I could go without blowing out the illuminated fog below over Pendleton, Oregon. I believe it's a better attempt than the first, but still room for improvement. A couple of vehicles went by and down Emigrant Hill during a couple of the exposures. I'm not quite sure if the illuminated foreground hurts or helps the image. What are your thoughts?Thanks for looking,
Wade
Attachments
Upvote
0
Well Wade, I like them, but I'm new to this too. Just keep on experimenting! I think car trails are cool too.
Jack
Jack
Upvote
0
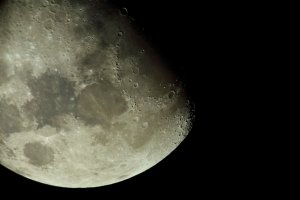
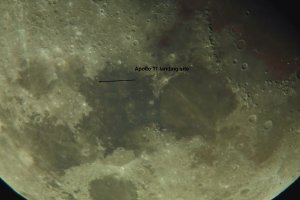
6D on a 2000mm f/10 telescope with 2xTC. Seas of Tranquility and Serenity, crater Plato and the nearby Alpine Valley, craters Archimedes and Eratosthenes, crater Copernicus at sunrise. ISO320, 1/25.
Larger view - macro extenders (total 65mm) added between 2xTC and camera body to increase the effective focal length. ISO640, 1/80.
Taken evening of 8 February, first decent night in two weeks.
Larger view - macro extenders (total 65mm) added between 2xTC and camera body to increase the effective focal length. ISO640, 1/80.
Taken evening of 8 February, first decent night in two weeks.
Attachments
Upvote
0
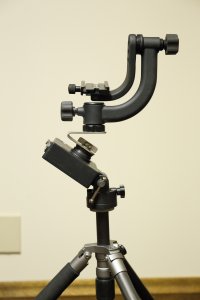
I know I am an anomaly in the world of photographers but I can't help getting into construction projects. Having purchased the iOptron Skytracker and not having a ball head I got to wondering how a gimbal could work, so I have made this mod. I can now use it, provided it's not too cold like the present -20 C and I'll report on how it works out. I'm also hoping that with a simple tapered block I could do horizon shots without ball head or gimbal with perhaps more rigidity and increased payload.
It's a fixed angle for my location so that's a potential problem for future consideration. I'm pretty sure working off the now level platform will be an advantage. We shall see.
Jack
It's a fixed angle for my location so that's a potential problem for future consideration. I'm pretty sure working off the now level platform will be an advantage. We shall see.
Jack
Attachments
Upvote
0
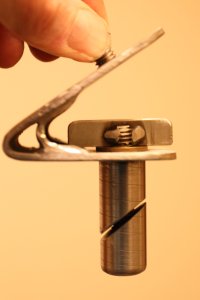
A small addition to the last post. It became apparent that the iOptron had a serious problem with the rotaional mount at the very bottom - a single small thumb screw that would prevent rotation but still allowed significant wobble.
The modification added here along with a thin shim washer in the latitude joint have really made a difference (it tensions up easier and with less rotation of the handle). The base rotation is now prevented by 3 external contact set screws and is solid like a rock. The mod consists of a sleave pressed over the original base and for security I used 3 setscrews along with the friction press fit over the base.
There is slight interference potential so I used bent screws, since they hang down when free and only require 1/4 turn to lock the base.
And, I am crazy enough to now try the 300 X2 with great care, but still no clear night and warm temp for that.
Jack
Attachments

Upvote
0

Upvote
0

Similar threads
D
- Replies
- 32
- Views
- 4K
- Replies
- 31
- Views
- 15K
- Replies
- 3
- Views
- 1K