Tutorial Section

This would be great and would be appreciated. As a long time lurker and first time poster I would also like to suggest one other feature, adding fields for pictures posted in the forms that list the camera, lens, shutter speed, ISO, aperture, filter, and level of photoshopping (ie HDR). Too often I find myself looking at the photos in the forms wondering how the photo was taken. By making it mandatory to supply the information on how the photo was taken and displaying it under the photo it would allow us amateurs to learn quickly from good examples about the mechanics behind the photo.
 
Upvote 0
Love the idea. There are some very knowledgeable people on this forum, that already write great articles (for example, I read through Neuroanatomist's article on autofocus yesterday and thought it was very good). I suspect that that's one of many of his articles. Given some of the information posted on this site, there must be many others already writing great content (or capable of it). It would be great see some of these articles listed on this site.

But playing devil's advocate, chances are that if you are good enough to write tutorials, then you're good enough to get paid for it, or develop your own site and have control over your intellectual property and, if you wanted, generate some income from it via advertising or through promotion of your own business. It would be interesting to see how many people would voluntarily contribute detailed content. But prove me wrong. Don't let my negativity affect things. I think its an excellent idea and worth trying.
 
Upvote 0
We have a section with how to articles on the front page of Canon rumors. Individuals are encouraged to submit articles for addition to the list.

Go to the Canon rumors page and hover on the articles section, and select one.

There is some good information there, and plenty of room for more.
 
Upvote 0
Mt Spokane Photography said:
We have a section with how to articles on the front page of Canon rumors. Individuals are encouraged to submit articles for addition to the list.

Go to the Canon rumors page and hover on the articles section, and select one.

There is some good information there, and plenty of room for more.
Yeah I see that, those a re little more epic than what I had in mind i guess you could call it a Tutorial / Review section and stick some of the reviews that neuro and others have done in there too. I'll knock up a little tutorial of the sort of thing i had in mind
 
Upvote 0
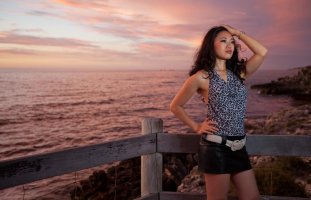
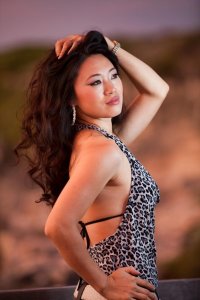
SAMPLE TUTORIAL - SIMPLE LOCATION CROSS LIGHTING WITH MANUAL FLASH

Sort of came to mind after the flash discussions
might help some of the people asking about starting out with flash

This is a basic lighting concept with the subject sandwiched between 2 lights, the key light and the rim light
its particularly usefull for location shoots where you want the background as part of the shot and the background adds to the effect ie a sunset beach

Equipment used
Camera - 5Dmk2
Lenses - 16-35f2.8L II and 70-200f2.8L IS II

Flashes - 2 x 580 exii (its all manual so any flash could be used though)
Flash trigger - cheap ebay radio triggers (poverty wizards)
a flash stand and a 33" white shoot through umbrella

Settings
ISO 400
Aperture f2.8
Shutter speed 1/125 (well within xsync for all cameras)
metering is set to spot
white balance is either sunny or flash (i cant remember)
wide shot 35mm on the 16-35f2.8
tight shot 200mm on the 70-200f2.8

The aim is to overpower the sun with the flash so the flash is the key light and the sun /sunset provides the rim / fill light.

The flashes are both set to manual and to full power connected to the top of the light stand on a multi flash bracket with the cheap radio triggers.

The flash stand with shoot through umbrella is located to camera right pointing toward the setting sun with the model in between approximate distance from the model is between 1m and 1.5m and the key light is above head height pointing towards the model.

Firstly to determine the exposure i simply spot metered the sunset sky and took a couple of shots to get the exposure set for the background. (depending on the light these settings will always be different usually 2 or 3 shots is all it takes to get your background exposure figured out. (dont worry about exposure for the model yet)

Once i was happy with the settings simply added the flash in to balance the lit model with the place the light stand in the correct alignment at a distance from the model and take a shot (make sure you have highlight alert on, ie the blinkies, so you can identify if you are blowing highlights) take a shot check the picture then move the light stand closer to the model if you need more light to balance the scene or further away if you are blowing out any highlights. . (also check your histogram)

It's very easy to tell from the LCD once you have the scene balanced and then you are all set up you can then shoot your poses even change lenses and change your shots.

if you only have one flash then the light will have to be closer to the model basically all you have to remember here is if you halve the distance of the light to the subject you increase your exposure 1 stop if you double the distance of the light from the subject you decrease your exposure by 1 stop. I used 2 flashes to let me keep the source further away.

there are other aspects of moving the light closer and further away such as quality of light etc (ie the further the light is away the more harsh the light and the closer the light the softer the light, based on it being a diffused light source from the umbrella)

but since this is a simple tutorial to help flash beginners out dont get too hung up on that

these shots are simply raw files brought into photoshop through camera raw, basic curves adjust, some contrast and clarity no adjustments to and colours or saturation, thats all done by the light.
 

Attachments

  • IMG_5150.jpg
    IMG_5150.jpg
    75.1 KB · Views: 660
  • IMG_5146.jpg
    IMG_5146.jpg
    74.1 KB · Views: 590
Upvote 0