You are using an out of date browser. It may not display this or other websites correctly.
You should upgrade or use an alternative browser.
You should upgrade or use an alternative browser.
first attempts at macro stacking, let's see some stuff. (beginners only please)
- Thread starter gnl.weirdness
- Start date


Scyrene,
Great photos.
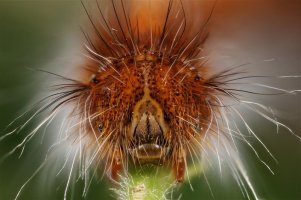
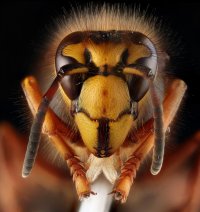
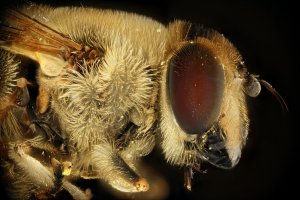
Bug eyes are incredible!
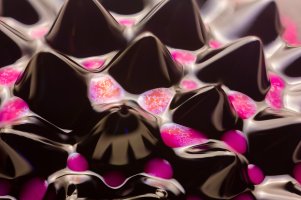
The ferro-fluid looks like chocolate spikes with raspberry sauce, almost edible. What kind of magnetic structure did you use behind the fluid?
And what lens do you use for the bug eyes?
Thanks.
-r
Great photos.
Bug eyes are incredible!
The ferro-fluid looks like chocolate spikes with raspberry sauce, almost edible. What kind of magnetic structure did you use behind the fluid?
And what lens do you use for the bug eyes?
Thanks.
-r
scyrene said:A few more from late last year, insects and ferrofluid.
Upvote
0
lion rock said:Scyrene,
Great photos.
Bug eyes are incredible!
The ferro-fluid looks like chocolate spikes with raspberry sauce, almost edible. What kind of magnetic structure did you use behind the fluid?
And what lens do you use for the bug eyes?
Thanks.
-r
scyrene said:A few more from late last year, insects and ferrofluid.
Thanks very much
") I love insect eyes especially!
I love insect eyes especially!The ferrofluid came with a small neodymium magnet. If you place a blob of the liquid on a surface, and the magnet underneath, the spikes form naturally along the magnetic field lines
Upvote
0
Thanks for the information.
Many, many years ago, I made some ferro-fluids for fun. Quite a bit of use.
-r
Many, many years ago, I made some ferro-fluids for fun. Quite a bit of use.
-r
scyrene said:lion rock said:Scyrene,
Great photos.
Bug eyes are incredible!
The ferro-fluid looks like chocolate spikes with raspberry sauce, almost edible. What kind of magnetic structure did you use behind the fluid?
And what lens do you use for the bug eyes?
Thanks.
-r
scyrene said:A few more from late last year, insects and ferrofluid.
Thanks very much
The ferrofluid came with a small neodymium magnet. If you place a blob of the liquid on a surface, and the magnet underneath, the spikes form naturally along the magnetic field lines
Upvote
0
lion rock said:Thanks for the information.
Many, many years ago, I made some ferro-fluids for fun. Quite a bit of use.
-r
scyrene said:lion rock said:Scyrene,
Great photos.
Bug eyes are incredible!
The ferro-fluid looks like chocolate spikes with raspberry sauce, almost edible. What kind of magnetic structure did you use behind the fluid?
And what lens do you use for the bug eyes?
Thanks.
-r
scyrene said:A few more from late last year, insects and ferrofluid.
Thanks very much
The ferrofluid came with a small neodymium magnet. If you place a blob of the liquid on a surface, and the magnet underneath, the spikes form naturally along the magnetic field lines
That's cool! What did you use? I just bought some on eBay, it's surprisingly cheap
Upvote
0
It started as a mixture of iron (II) and iron (III) sulphate in water solution and ammonia is used to precipitate the iron salts as hydroxide. It is heated to change them to the respective oxides, this part I don't remember too well (been nearly 30 years). An oil (oleic acid) is used to form a hydrophobic long linear chain with the iron oxides, at one end of the chain, which then is suspended in kerosene. Magnetic ferro fluid!
I understand the material is used in the solenoid gap between the magnet poles in high power power loud speakers to help dissipate heat. It is also use in some magnetically operated valves.
-r
Thanks very much I love insect eyes especially!
The ferrofluid came with a small neodymium magnet. If you place a blob of the liquid on a surface, and the magnet underneath, the spikes form naturally along the magnetic field lines
[/quote]
[/quote]
That's cool! What did you use? I just bought some on eBay, it's surprisingly cheap
[/quote]
I understand the material is used in the solenoid gap between the magnet poles in high power power loud speakers to help dissipate heat. It is also use in some magnetically operated valves.
-r
[/quote]scyrene said:A few more from late last year, insects and ferrofluid.
Thanks very much
I love insect eyes especially!The ferrofluid came with a small neodymium magnet. If you place a blob of the liquid on a surface, and the magnet underneath, the spikes form naturally along the magnetic field lines
[/quote]
[/quote]
That's cool! What did you use? I just bought some on eBay, it's surprisingly cheap
[/quote]
Upvote
0
So i tried this again after many failed attempts. your previous examples made me thing maybe i can do it. Here are two examples one with the trial Helicon and on with Photoshop cc. Can anyone explain why photoshop cc looks better but it can never get a good stack. there are always weird blury parts or its just unable to do it.
Helicon got it but there is a lot of noise introduced and it isnt as crisp anymore. Any help is greatly appreciated.


Helicon got it but there is a lot of noise introduced and it isnt as crisp anymore. Any help is greatly appreciated.
Upvote
0
gjones5252 said:So i tried this again after many failed attempts. your previous examples made me thing maybe i can do it. Here are two examples one with the trial Helicon and on with Photoshop cc. Can anyone explain why photoshop cc looks better but it can never get a good stack. there are always weird blury parts or its just unable to do it.
Helicon got it but there is a lot of noise introduced and it isnt as crisp anymore. Any help is greatly appreciated.
Which stacking method did you use in HeliconFocus? The three different methods vary in effectiveness depending on the type of subject. Best to fiddle around with different settings. If the Helicon one is the second image, then I imagine you used pyramid - that can blow out highlights and cause posterisation. Best to use low contrast jpegs rather than raw images for that.
Upvote
0
Here's my shot at a fly I made with a friend of mine 2 years ago.
Actually, it is a composite shot of the same fly taken at different times.
- In the center is the fly imaged with my camera in a macro stack. About 20 frames if I remember well. I was using a reversed 17-85mm on a 7D body for a magnification of about 5x.
- To the right is the same fly with the same imaging technique after depositing a thin layer of gold on it.
- To the left is the fly imaged using a Scanning Electron Microscope. The deposition of the thin layer of gold was necessary to be able to do the electron microscopy on the fly.
The left image was taken in one shot, no stacking needed. It shows well the incredible depth of field that can be obtained by using an electron microscope compared to optical lenses. However, this comes at the expense of colour, of course
And for those who may worry; the fly was already dead when we found it... so we didn't kill it by covering it with gold and entering it into the electron microscope... Although that would certainly have killed a living fly!
Attachments

Upvote
0
After reading this topic, I decided to give Focus Stacking a try, so I downloaded Helicon Focus.
I have to admit that it is a very interesting tool, I will try again in future, and iwill try even other software, just out of curiosity.
It require, for high magnification, a very sturdy tripod, otherway the micro movement of the camera will give unpredictable result, and you'll have to do the work manually.
Here what I tried:
Empty exuvia of a swallowtail butterflies, Eos 6d, Canon 100mm macro with 3 flash for lighting 18 pictures merged with Helicon focus.

Second picturs, the same subject RR 1:1 , eos 6D,Canon MPE 65mm macro @ about 1:1 with 3 flash for lighting 19 pictures merged with Helicon focus.
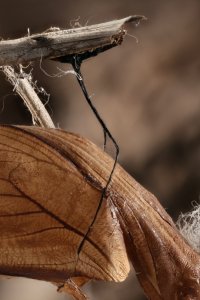
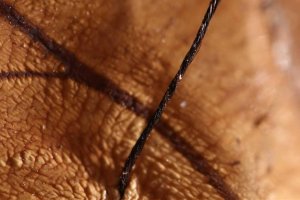
Then a very small fibre of silk from the same pupa, using eos 6D, MPE 65mm macro @ 5:1 with 3 flash for lighting 3 pictures manually merged with Paint Shop Pro.
Ciao Diego
I have to admit that it is a very interesting tool, I will try again in future, and iwill try even other software, just out of curiosity.
It require, for high magnification, a very sturdy tripod, otherway the micro movement of the camera will give unpredictable result, and you'll have to do the work manually.
Here what I tried:
Empty exuvia of a swallowtail butterflies, Eos 6d, Canon 100mm macro with 3 flash for lighting 18 pictures merged with Helicon focus.
Second picturs, the same subject RR 1:1 , eos 6D,Canon MPE 65mm macro @ about 1:1 with 3 flash for lighting 19 pictures merged with Helicon focus.
Then a very small fibre of silk from the same pupa, using eos 6D, MPE 65mm macro @ 5:1 with 3 flash for lighting 3 pictures manually merged with Paint Shop Pro.
Ciao Diego
Attachments

Upvote
0
hyles said:After reading this topic, I decided to give Focus Stacking a try, so I downloaded Helicon Focus.
I have to admit that it is a very interesting tool, I will try again in future, and iwill try even other software, just out of curiosity.
It require, for high magnification, a very sturdy tripod, otherway the micro movement of the camera will give unpredictable result, and you'll have to do the work manually.
Great work, well done! But don't feel too constrained, I've done plenty handheld focus stacks. You just have to be as steady as possible
Upvote
0
Here is one of the first focus stacks I did. I used 18 images for this one, the second image is a 100% crop. Shot at f8 for lens sharpness but I let the 'natural' effect of dof falloff remain, just mitigated it somewhat with the stack.
Attachments

Upvote
0
I dont really remember, honestly as my first time using it based on a recommendation on here. I pretty much just hit go and this is what came out. I will look and double check the settings.scyrene said:gjones5252 said:So i tried this again after many failed attempts. your previous examples made me thing maybe i can do it. Here are two examples one with the trial Helicon and on with Photoshop cc. Can anyone explain why photoshop cc looks better but it can never get a good stack. there are always weird blury parts or its just unable to do it.
Helicon got it but there is a lot of noise introduced and it isnt as crisp anymore. Any help is greatly appreciated.
Which stacking method did you use in HeliconFocus? The three different methods vary in effectiveness depending on the type of subject. Best to fiddle around with different settings. If the Helicon one is the second image, then I imagine you used pyramid - that can blow out highlights and cause posterisation. Best to use low contrast jpegs rather than raw images for that.
it just drives me nuts to pay for a program to do this when i have photoshop but it never seems to get really good focus stacking but on my first try Helicon can at least put the images together.
Upvote
0
gjones5252 said:I dont really remember, honestly as my first time using it based on a recommendation on here. I pretty much just hit go and this is what came out. I will look and double check the settings.scyrene said:gjones5252 said:So i tried this again after many failed attempts. your previous examples made me thing maybe i can do it. Here are two examples one with the trial Helicon and on with Photoshop cc. Can anyone explain why photoshop cc looks better but it can never get a good stack. there are always weird blury parts or its just unable to do it.
Helicon got it but there is a lot of noise introduced and it isnt as crisp anymore. Any help is greatly appreciated.
Which stacking method did you use in HeliconFocus? The three different methods vary in effectiveness depending on the type of subject. Best to fiddle around with different settings. If the Helicon one is the second image, then I imagine you used pyramid - that can blow out highlights and cause posterisation. Best to use low contrast jpegs rather than raw images for that.
it just drives me nuts to pay for a program to do this when i have photoshop but it never seems to get really good focus stacking but on my first try Helicon can at least put the images together.
Helicon is a great program, and not too expensive. If you do stacking a lot, it's well worth it. It's not the easiest to get used to at first, but there is a reasonable user guide online. Mostly it's trial and error, as they admit themselves. Different types of subject (flat, complex, shiny, etc) will have different requirements.
It's also worth nailing the shooting technique for this. Take more shots than you need. You want some overlap of the in-focus areas so there aren't bands of softness in the finished image. Alternatively, if you're using an autofocus lens, you can tether it and get HeliconRemote to shoot the stack for you. That works well, but I think costs extra, and is no use for the MP-E lens of course.
Upvote
0
Here a couple of new shot just take, the portrait of the caterpillar about 10 pictures at f4, the entire caterpillars 46 pictures.
Hand holding camera it is very difficult mantinig allignmet of the images thus giving strange result, so after a few try I decided to use a tripod..
Really nice way of taking macro...
Diego
Hand holding camera it is very difficult mantinig allignmet of the images thus giving strange result, so after a few try I decided to use a tripod..
Really nice way of taking macro...
Diego
Attachments

Upvote
0
I have been meaning to try stacking and just never got to it, so you folks inspired me! I decided to try it on a wood carving I made a few years ago. Focused on the back of Marvin's helmet and worked my way to Bugs' ears. Only 5 pictures...probably could have used many more. 100mm Macro lens at f5.6 using manual focus on a tripod. I then processed the pictures in CS6 and was actually surprised at how well it worked.
Attachments

Upvote
0
Although formally I would not consider myself a beginner, it's too tempting not to show some of my work ;D
Attachments
Upvote
0
I've just started trying to stack images. Just using photoshop, but not having a good time with it. PS seems to randomly choose areas to blend in my images that make no sense. So I've just been doing it by hand. With the flower images I've been working with, it's pretty easy to do. I couldn't imagine trying something more complicated by hand though. That would be insanely tedious.
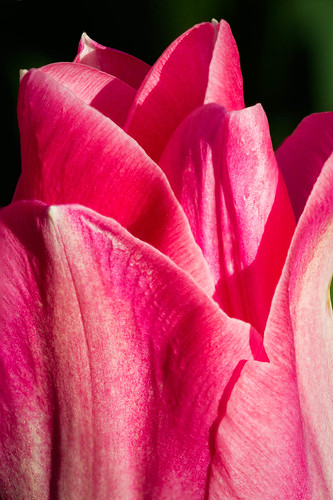 Tulip by Joe, on Flickr
Tulip by Joe, on Flickr
Upvote
0