Little Booger

Ozarker

Love, joy, and peace to all of good will.
CR Pro
Jan 28, 2015
5,933
4,336
The Ozarks
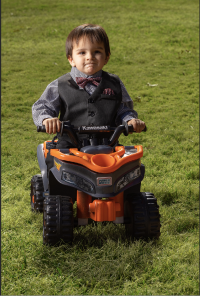
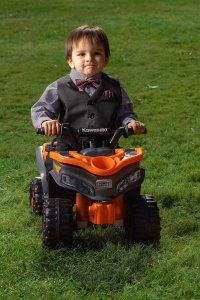
My biggest accomplishment in 2019... getting this little guy to put on his suit and actually pose long enough for me to dial in exposure. Not perfect, but good enough. I know there's a way to make the grass green. I need to work on that.
Canon EOS R, RF 85mm f/1.2 @ f/8, dual AD200 mono lights with a glow EZ Lock 38" deep parabolic modifier.
 

Attachments

  • Suit web.jpg
    Suit web.jpg
    2.4 MB · Views: 202
  • Like
Reactions: 3 users
My biggest accomplishment in 2019... getting this little guy to put on his suit and actually pose long enough for me to dial in exposure. Not perfect, but good enough. I know there's a way to make the grass green. I need to work on that.
Canon EOS R, RF 85mm f/1.2 @ f/8, dual AD200 mono lights with a glow EZ Lock 38" deep parabolic modifier.

Water it! Nice shot!
 
  • Haha
Reactions: 2 users
Upvote 0

Michael Clark

Now we see through a glass, darkly...
Apr 5, 2016
4,722
2,655
My biggest accomplishment in 2019... getting this little guy to put on his suit and actually pose long enough for me to dial in exposure. Not perfect, but good enough. I know there's a way to make the grass green. I need to work on that.
Canon EOS R, RF 85mm f/1.2 @ f/8, dual AD200 mono lights with a glow EZ Lock 38" deep parabolic modifier.
Use the HSL tool in DPP 4. Set the Yellow hue to about +10 (towards Green), the Yellow saturation to about -2 or -3, and the Yellow luminance to about -1. Set the Green saturation to +1 or +2 and the Green luminance to about -2.

You'll probably then need to play with the orange channel to remove the very slight greenish color cast from his skin.
 
  • Like
Reactions: 1 user
Upvote 0

Ozarker

Love, joy, and peace to all of good will.
CR Pro
Jan 28, 2015
5,933
4,336
The Ozarks
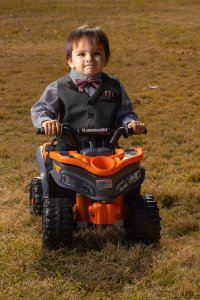
Hopefully people around here know I mean no harm or disrespect when I have one of my editing plays.

View attachment 187573
Absolutely no offense taken at all. It is a much better photo now! Thanks so much. I use Lightroom/Photoshop. Can you explain the process? Thank you! Our grass is all fall brown right now. I must have watched 10 youtube videos and none of them helped me. I'd love to do this with a full sized image to print for my daughter. Your edit is absolute perfection PBD.
 
Last edited:
Upvote 0
Jan 29, 2011
10,675
6,121
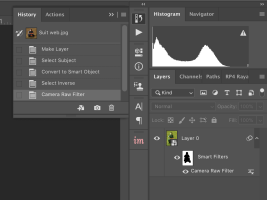
The edit was very simple, in LR get the subject white balance etc where you want it to be then open in PS. In PS change from Background layer and use Select - Subject, this does 95% of the work for you but take a moment to clean up the selection, invert the selection, then Convert to Smart Object and select Filter - Camera RAW Filter, the selection will automatically be applied to the filter mask. Then go to HSL and turn the Orange and Yellow sliders up, then in basic move WB and Saturation and Vibrance to get the green where you want it (ignore what is happening to the subject) when you are happy click OK. Done.

It took much longer to write it than do it! It took me less than three minutes to do the edit including the selection, PS Selection 'Subject' is very good for stuff like this.

Your history and layers panel should look like this.

Screen Shot 2019-11-20 at 19.19.39.png
 
  • Like
Reactions: 1 user
Upvote 0

Ozarker

Love, joy, and peace to all of good will.
CR Pro
Jan 28, 2015
5,933
4,336
The Ozarks
The edit was very simple, in LR get the subject white balance etc where you want it to be then open in PS. In PS change from Background layer and use Select - Subject, this does 95% of the work for you but take a moment to clean up the selection, invert the selection, then Convert to Smart Object and select Filter - Camera RAW Filter, the selection will automatically be applied to the filter mask. Then go to HSL and turn the Orange and Yellow sliders up, then in basic move WB and Saturation and Vibrance to get the green where you want it (ignore what is happening to the subject) when you are happy click OK. Done.

It took much longer to write it than do it! It took me less than three minutes to do the edit including the selection, PS Selection 'Subject' is very good for stuff like this.

Your history and layers panel should look like this.

View attachment 187574
Thanks! I'll give it a try. Once I get it I'll do it a few dozen times to imprint it in my mind. That's the only way I can retain. Thanks so much again!
 
  • Like
Reactions: 1 user
Upvote 0

Ozarker

Love, joy, and peace to all of good will.
CR Pro
Jan 28, 2015
5,933
4,336
The Ozarks
Thanks! I'll give it a try. Once I get it I'll do it a few dozen times to imprint it in my mind. That's the only way I can retain. Thanks so much again!
Works like a charm! Except, without sounding too stupid, I have no idea how to clean up the selection where it doesn't select parts of the grass.
 
Upvote 0
Jan 29, 2011
10,675
6,121
Works like a charm! Except, without sounding too stupid, I have no idea how to clean up the selection where it doesn't select parts of the grass.
After you have made the selection Select - Subject go back into the Select column and choose - Select and Mask... you can then refine, add to and delete from the selection.

Just select the brush tool and add or subtract by painting with black or white.

This is an excellent video explaining the newer Select - Subject and refining that selection.

 
Last edited:
  • Like
Reactions: 1 user
Upvote 0
Jan 29, 2011
10,675
6,121
I'm very glad you found it helpful CFB, to be sure there are more efficient ways of getting the same result but the way I outlined retains edibility to a great degree, working with Smart Objects is very useful if you think you might want to change edits with zero IQ impact.

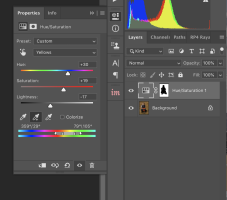
The simplest way that comes to mind is to do a LR edit to taste for just the subject, then open in PS, then do the Select - Subject, and refine that selection, then make a Hue and Saturation layer and the selection will automatically be a mask, if it is the wrong way round just invert the layer mask. Then adjust that Hue Saturation layer for the grass using the Yellows slider and adjusting the color range scale with the eyedropper to get all the different grass tones included.

Here are the settings I used to get these colors, but obviously it is entirely to taste.
Screen Shot 2019-11-21 at 11.20.52.png


Screen Shot 2019-11-21 at 11.19.21.png
 
  • Love
Reactions: 1 user
Upvote 0