My first panorama - Tetons What did I do wrong?

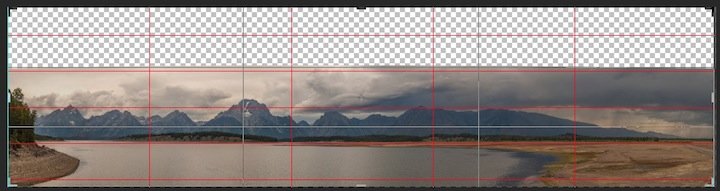
So, this was from a trip I took this summer, I'm finally getting around to doing the panorama stitching. I used Photoshop CS6's autostitch tool to combine all the photos. I put my camera on a tripod, taking vertical photos using a 70-200mm F/4 lens. The water line sags pretty bad in the middle. Is that because of the way the camera pivoted on the tripod? I was very careful with the placement of the tripod, I'm pretty sure it was level all the way across. Maybe I didn't take enough photos to stitch smoothly (I don't think I had a whole lot of overlap between frames)? Or can I just "bend" it back up in photoshop? I'm pretty new to the tool, so I'm not sure what's possible or if I should even attempt it.


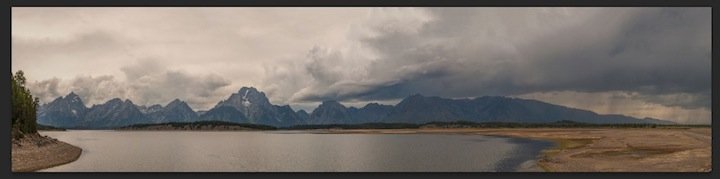
Tetons Panorama by yorgasor, on Flickr
 
I had problems with CS6 and my panoramas at first as well. Now, as long as I check "cyclindrical" instead of "auto" and "geometric correction" or whatever it says, they seem to turn out well. I have a tripod head that shoots off of the nodal point, but I rarely ever use it, and they typically turn out fine--better if I use a tripod and try to get the camera level than if I do it handheld.
 
Upvote 0
Hi there

Beautiful panorama. And nice result for an autostitching funtion.

And the good news: the problem is not in the pictures or in the technique of the pictures taken.

At that distance the nodal point is pretty much not an issue. (ever)
The overlapping looks just fine too.
The problem is the "auto" in the function you mentioned. :-\

The problem is the same as if you grap 3 cola botles by the neck. The bottom end will spread out. And that is what happend here. The pictures were autostitched in the upper middle and the lower end of the resulting immage got streched out.

Even when all pictures are fine, autostitching functions tent to bend pictures, depending on what the programm decides on matching together. In bad cases the result looks like 'snakeways' :eek: (in bad cases changing from picture to picture).

The previous post is verry promising though.

good luck ! ;)
 
Upvote 0
Bingo! I believe that mdflare has it nailed!

Parallax problems only occur when near and far objects don't align in overlapping images and this is obviously not the case here. I don't do a lot of large panos (with many different images), but when I want to quickly stitch three "shifted" images that I got with a TS-E lens I always first try the simple-old "Reposition" option in Photoshop's Photomerge.
 
Upvote 0
I do a lot of panorama stitching, and I use Autopano Giga for that. It gives you the option to autodetect a panorama, and then it gives extensive edit options, like move the horizon.

That last thing would have fixed this panorama. Autopano Giga also accepts stacks of picures for a HDR panorama which usually works well for backlit buildings, as it sort off artificially fill flashes the building. But thats a bit off topic.

Autopano have a working demo that watermarks the end result. That way you can give it a go without spending any money.
 
Upvote 0
Jul 21, 2010
31,254
13,111
jrda2 said:
Did you use a slide and find the nodal point of the lens at the focal length used? If not, your problem is likely from parallax. Search nodal point determination for panoramas on the web- there are plenty of instructional articles and videos. Really Right Stuff is one company that sells the necessary components.

Parallax is really only an issue with both close and far subjects in the same panorama.
 
Upvote 0
Jun 11, 2013
422
161
bgran8 said:
I had problems with CS6 and my panoramas at first as well. Now, as long as I check "cyclindrical" instead of "auto" and "geometric correction" or whatever it says, they seem to turn out well. I have a tripod head that shoots off of the nodal point, but I rarely ever use it, and they typically turn out fine--better if I use a tripod and try to get the camera level than if I do it handheld.
+1, I had problems with some recent panos in PS but checking "cylindrical" fixed the stitching. I also use PTIgui Pro - it is especially useful for panos where misalignment of stitches is likely and visible - i.e. - architecture.

Looks like you have great raw material for a nice pic - good luck.
 
Upvote 0
As others have said, it's better to try the different options in PS rather than picking auto. I've ran into the same thing with it. I actually had one where it tried to do rectilinear stretching on one side, and cylindrical on the other!!

One of these days, I'll save up for Autopano Pro just for the quick preview before processing, it's really nice.
 
Upvote 0
yorgasor said:
Or can I just "bend" it back up in photoshop? I'm pretty new to the tool, so I'm not sure what's possible or if I should even attempt it.

If you're using Photoshop CS6, which you are, then you can use the Adaptive Wide Angle Correction listed under Filters. I use it on almost all of my panoramas. You might look up a tutorial online but it allows you to draw a line across your photo and PS will automatically curve that line across the dip in your photo. Once you're done dragging, the curve will automatically straighten and you can right click on it to make it perfectly horizontal if you'd like.

You really only have one good curve across your particular image (base of the mountain) but let's say you had two or three horizontal lines across your image. You could straighten each of those. As the name implies, it's meant to correct for wide angle lenses, and it works wonders, but it's also useful for panoramas.

Hope this helps!
 
Upvote 0
yorgasor said:
Excellent! Thanks for the tips! I'll play with the options suggested for stitching and see if I can get better results from photoshop before I move on and try Autopano Giga. Now that I know how easy the stitching is, I'll be more willing to play with it, as long as I can make it look right.

if you try Autopano Giga.... take care that your Images have 20-30% overlap. below 20% autopano will have Problems to find enough good control Points for a perfect result. if the neighbor Images have similar textures like sky, water, sand etc than manually adding control Points can help. For big panos with hundrets of Image positions it can be a stupid underpinned by senseless plan to move the Image to c orrect Position.... than a panoramic head like merlin, panoneed (which can write with addon tool XML logs files with papywizard compatible Format), VR Drive2 Comes with own XML file Format, Clauss Radeon also Comes with own XML fileformat, gigapan too.... and all mentioned XML files created can be imported in autopano giga. papywizard is a Software availabel for mac and pc and some mobiles too with Bluetooth you can drive your merlin head. the papywizard Software creates also autopano compatible XML files.
the XML files wonder magix is the exaxt Image poisiton is recorded in and the autopano giga can place all Images to correct Position, even if no single control Point can be found between the Images.

I'm available on kolor.com/Forum with same nicname...

Liebe Gruesse,
Georg
 
Upvote 0
soccerkingpilot said:
yorgasor said:
Or can I just "bend" it back up in photoshop? I'm pretty new to the tool, so I'm not sure what's possible or if I should even attempt it.

If you're using Photoshop CS6, which you are, then you can use the Adaptive Wide Angle Correction listed under Filters. I use it on almost all of my panoramas. You might look up a tutorial online but it allows you to draw a line across your photo and PS will automatically curve that line across the dip in your photo. Once you're done dragging, the curve will automatically straighten and you can right click on it to make it perfectly horizontal if you'd like.

You really only have one good curve across your particular image (base of the mountain) but let's say you had two or three horizontal lines across your image. You could straighten each of those. As the name implies, it's meant to correct for wide angle lenses, and it works wonders, but it's also useful for panoramas.

Hope this helps!

Ooh, this sounds very good. I'm just about to fly out to Utah, I'll see if I can try some of these tips and post the results. Maybe compare the different options to see if there are some that causes image quality losses between the different techniques.
 
Upvote 0

PTT

6D
Mar 19, 2013
23
0
Have you thought of using the Warp tool in CS6 to straighten your pano? I find that Adaptive Wide Angle gets wonky on me sometimes.
Pano1: Your original with grid lines (gray) applied (percentage rather than a fixed number..set that in prefs.)
Pano2: Grid lines in red. Warp tool in gray. Nudge the Warp tool until the water and horizon are flat.
Pano3: Expand the dramatic sky and move the mountains into the bottom 3rd of the image. Select the Crop tool and drag the top edge upward. Flatten the image, then select the expanded section and a few pixels of the sky, then use Content Aware Fill.
Pano4: Finished fix. Clean up any weird stuff in the expanded sky with Spot Healing Brush (content aware.)
 

Attachments

  • Pano1.jpg
    Pano1.jpg
    46.4 KB · Views: 436
  • Pano2.jpg
    Pano2.jpg
    51.4 KB · Views: 465
  • Pano3.jpg
    Pano3.jpg
    74.1 KB · Views: 485
  • Pano4.jpg
    Pano4.jpg
    50.2 KB · Views: 431
Upvote 0
Ok, as promised, here's my updated version. This version was just a simple change of selecting 'cylindrical' instead of 'auto' for the merge type. This gave me a much cleaner horizon to work with. Although the changes made by PTT with the warp tool are pretty impressive. I like the thicker panorama with the taller clouds that he made.


Tetons Panorama 2 by yorgasor, on Flickr
 
Upvote 0
Feb 12, 2014
166
1
wish there was a way to preview what the different PS pano modes do. took some of the tips in this thread and improved one of mine that was suffering from curved horizon. but now i cant remember which stitching mode worked best, i think it was also cylindrical. thanks for the tips folks!
 

Attachments

  • 20140125-IMG_0609-Edit.jpg
    20140125-IMG_0609-Edit.jpg
    224.4 KB · Views: 316
Upvote 0
yorgasor said:
The water line sags pretty bad in the middle. Is that because of the way the camera pivoted on the tripod? I was very careful with the placement of the tripod, I'm pretty sure it was level all the way across. .

Let's call what you refer to as the waterline, …"the shoreline".

You can not accurately portray the far shoreline as a straight line, if in fact the shore in the center is closer to you than at the sides.

A simple compositional correction, to give a more satisfying "balance" to the eye, would be to tilt the image so that the "chord" of the shoreline curve ( a straight line between the ends of what you call the waterline, i.e., the dark streak approximately midway up the image) is "level".

You will lose a bit of the left foreground shore, but the image will, IMO, "Feel" more "right".

HTH. ;)
 
Upvote 0