For those of you who shoot landscapes with a large stop difference between earth and sky (dawn and dusk); do you like to use graduated or solid ND Filters?
You are using an out of date browser. It may not display this or other websites correctly.
You should upgrade or use an alternative browser.
You should upgrade or use an alternative browser.
ND Filters - Solid or Graduated
- Thread starter Moody Blues
- Start date
Hard or soft graduated ND is what you need for that dynamic range, depending on whether the demarcation is straight (hard grad) or not (soft grad). An ND would be needed if contemplating long exposures.
Upvote
0
Thanks for the replies. I am going to grab the Lee Filter 4X6 hard and soft ND Filter Kits. Now if I can just find the base holder.
Upvote
0
You won't be disappointed with those Lee filters... provided you can find them and the base!
I personally shoot with soft lee ND grads. I'm usually shooting mountains so had ND grads aren't the way to go (don want dark lines running across the tips of your mountains!
I personally shoot with soft lee ND grads. I'm usually shooting mountains so had ND grads aren't the way to go (don want dark lines running across the tips of your mountains!
Upvote
0
I'm in the market for filters. Really want Lee's, but the availability is not there. Not sure I want to invest in a product that is not readily available. From what I have read it has been like that for years. They have had months to increase production but it appears they havn't done near enough to keep up. The wait is 6 months in the places I have checked. Looking at other alternatives.
Upvote
0
sure shot said:The Soft and Hard Grad ND filters are a must. Their "Big Stopper" ND is also a lot of fun. Also the 105mm Polarizer and Adaptor are essential too.
They are tricky to find and sell out fast. You can pay a premium and get them off of eBay.
Not strictly true, I bought the Big Stopper and a hard graduated set together with a holder and 82 mm wide angle adapter this week, I contacted Lee themselves and they pointed to their dealers in the EU, it was paid for on Monday, shipped on Tuesday and arrived on Thursday across the EU.
Upvote
0
For those talking about availability: You have to understand that Lee makes as much product as it wants to sell.
I know it's hard to understand in this world of "Must make millions" to be happy... but not everyone wants to grow the largest company in the world... and not everyone has a problem with there being more demand than supply. Maybe they don't _want_ to "do anything about it".
I read an article about Lee a couple of years ago in the UK based Outdoor Photographer magazine (which is excellent BTW... I highly recommend it for anyone getting into landscape or wildlife photography... even if you're not from the UK). It sounds like a fairly small and tight-knit operation. Did you know that every one of their filters are _hand dipped_ by a team of women? Not sure why it's only women but it was evident that they take pride in their craft and insist on doing it right.
When it comes to needing a piece of glass between my lens and the world... I will trust those who take their time and care about their craft and mine over some huge factory corporation that keeps the "shelves stocked".
Lee are scarce for a reason. There's a reason these threads pop up nearly every week on forums across the internet. Don't let availability scare oh off from your purchase. Take that as a sign that the product is _good_ and is going to be around for a while.
Upvote
0
friedmud said:For those talking about availability: You have to understand that Lee makes as much product as it wants to sell.
I know it's hard to understand in this world of "Must make millions" to be happy... but not everyone wants to grow the largest company in the world... and not everyone has a problem with there being more demand than supply. Maybe they don't _want_ to "do anything about it".
I read an article about Lee a couple of years ago in the UK based Outdoor Photographer magazine (which is excellent BTW... I highly recommend it for anyone getting into landscape or wildlife photography... even if you're not from the UK). It sounds like a fairly small and tight-knit operation. Did you know that every one of their filters are _hand dipped_ by a team of women? Not sure why it's only women but it was evident that they take pride in their craft and insist on doing it right.
When it comes to needing a piece of glass between my lens and the world... I will trust those who take their time and care about their craft and mine over some huge factory corporation that keeps the "shelves stocked".
Lee are scarce for a reason. There's a reason these threads pop up nearly every week on forums across the internet. Don't let availability scare oh off from your purchase. Take that as a sign that the product is _good_ and is going to be around for a while.
+1 there is a video on Youtube actually portraying them doing the whole process.
Upvote
0
If you're shooting digital, there's rarely any situation in which graduated (not solid) neutral density filters make sense.
Rather, what you really want, is the simplest type of HDR. Take two exposures, one for the part of the scene where you'd use the dark part of the filter and another for the light. Then, in Photoshop, put each on their own layer. You can then use a mask with the gradient tool to perfectly mimic the effect of the filter. Or, for something that'll work even better, use a big, fat, soft brush to brush in (or out) the one exposure (or the other).
That's really all that the best-done HDR work logically comes down to: a customized graduated neutral density filter. The quality of the end result is directly proportional to the quality of the masking, which can be seen as the skill in constructing the perfectly-shaped ND filter for that particular scene.
That's also why all those auto-tonemapped halo-filled neon photoillustrations look so weird...it's like looking at the world through the most bizarre ND filter you can imagine.
Cheers,
b&
Upvote
0
TrumpetPower! said:If you're shooting digital, there's rarely any situation in which graduated (not solid) neutral density filters make sense.
Rather, what you really want, is the simplest type of HDR. Take two exposures, one for the part of the scene where you'd use the dark part of the filter and another for the light. Then, in Photoshop, put each on their own layer. You can then use a mask with the gradient tool to perfectly mimic the effect of the filter. Or, for something that'll work even better, use a big, fat, soft brush to brush in (or out) the one exposure (or the other).
That's really all that the best-done HDR work logically comes down to: a customized graduated neutral density filter. The quality of the end result is directly proportional to the quality of the masking, which can be seen as the skill in constructing the perfectly-shaped ND filter for that particular scene.
That's also why all those auto-tonemapped halo-filled neon photoillustrations look so weird...it's like looking at the world through the most bizarre ND filter you can imagine.
Cheers,
b&
Two comments...
First, I personally don't have the Photoshop skills to get the sharpness out of an HDR that I can get using the ND filters. I'm not relying on software to align the images.
Second, I would rather get the exposure right when I am making the picture than do it in post. That's just a personal preference, for me though the fun is out in the field, not at home in front of the computer.
Don't get me wrong though, I'm seriously considering getting the latest version of Photoshop and really learning how to use it.
Upvote
0
96Brigadier said:First, I personally don't have the Photoshop skills to get the sharpness out of an HDR that I can get using the ND filters. I'm not relying on software to align the images.
No mad Photoshop skillz needed.
Use a tripod (which you should be doing anyway) and don't move the camera between exposures. And adjust the exposure with the shutter speed while leaving the aperture and ISO alone.
Open both images in Photoshop. Press, hold, and keep holding the shift key. Drag the layer icon of the one image onto the window of the other image. Release the shift key. (You were still holding it, right?) The two frames are now laid on top of each other, perfectly aligned.
Click the icon to add a mask to the topmost image. Use the gradient tool on the mask. Experiment at random and you'll very quickly figure it out, but the short version is that where you click and hold is where the foreground color starts, and where you let go is where the background color starts; the transition (gradient) is between those two points. On the mask, black conceals and white reveals.
And there's your graduated ND filter, however hard or soft you want, positioned wherever you want and at whatever angle you want. Don't like where it wound up or how soft / hard it was? Just use the gradient tool to re-do it and you've got a fresh new ND filter.
That's all there is to it.
For bonus points, use a big, soft brush instead of the gradient to paint in or out the top layer.
For super extra bonus points, use more than two exposures and selectively mask in or out bits from each of them...and there's your HDR.
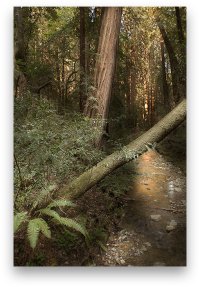
The attached image I did like that some years ago. If I remember right, it's three exposures. Classic 5D with the original TS-E 24, at the bottom of Muir Woods. It's probably time for me to re-visit this one...I can do better today, I think....
Cheers,
b&
Attachments
Upvote
0
There are many techniques out there - and it is good to understand them and apply them to the situation.
HDR and Photoshoping multiple images are ways to do it in some cases. You can get some very stunning, dramatic effects. But sometimes multiple exposures dont work - especially when sky elements are moving - fast moving clouds, direct sun, so on, dont always play nicely with HDR (I have the NIK product); This is also true in action / sports shots.
I also have a growing set of 4x6 Lee for many critical shots where there is a delineation that is soft or hard. It makes for a natural transition and its one full exposure. Sometimes I like to apply that effect.
For the original question, it has not been fully explained...
You use Graduated Filters to affect the exposure an specific areas of the image. Most often, its a bright sky and darker landscape, but it could be any number of situations where sections must be exposed down.
You use Solid ND Filters to extend the exposure time across the entire image. This can be useful for very wide open shooting in bright light where you cant get a fast enough shutter speed; or more conventionally for timelapsing water/waterfalls, bluring out people in crowded areas, or to add a certain texture to the image with a range of stationary and moving elements (a softened field in front of a rock solid mountain for example). I have a custom Lee-format filter that has Solar Film to shoot the solar eclipses and transits.
I used to use round when I was playing 77mm. Now I have a number of lenses - so going square Lee (or Cokin) allows one filter to be used on a variety of lenses. And of course, with Graduated Filters you need to position them.
One note to add, beyond Grads, Solids, Polarizers, and Protection filters, most everything else can definitely be done in Post.
Upvote
0
charlesa said:Not strictly true, I bought the Big Stopper and a hard graduated set together with a holder and 82 mm wide angle adapter this week, I contacted Lee themselves and they pointed to their dealers in the EU, it was paid for on Monday, shipped on Tuesday and arrived on Thursday across the EU.
From which retailer did you get yours?
Upvote
0
Personally, I don't like HDR, except on some occasions (there are some good examples). It is far overused in my opinion and in many cases badly (which makes the technique look worse than it is). Putting that aside though, there are many scenes where it just simply doesn't work, such as scenes containing snow to name one example. Also, adding gradients in Lightroom or Photoshop isn't going to recover detail that isn't there in the first place. If the sky is blown, then gradients are a waste of time, at best, you'll get bright white areas, at worst, you may also get weird colour casts. It's far better to use a grad (or two) to preserve the detail, even if it isn't quite enough, so that the detail is there for recovery in processing.TrumpetPower! said:96Brigadier said:First, I personally don't have the Photoshop skills to get the sharpness out of an HDR that I can get using the ND filters. I'm not relying on software to align the images.
No mad Photoshop skillz needed.
Use a tripod (which you should be doing anyway) and don't move the camera between exposures. And adjust the exposure with the shutter speed while leaving the aperture and ISO alone.
Open both images in Photoshop. Press, hold, and keep holding the shift key. Drag the layer icon of the one image onto the window of the other image. Release the shift key. (You were still holding it, right?) The two frames are now laid on top of each other, perfectly aligned.
Click the icon to add a mask to the topmost image. Use the gradient tool on the mask. Experiment at random and you'll very quickly figure it out, but the short version is that where you click and hold is where the foreground color starts, and where you let go is where the background color starts; the transition (gradient) is between those two points. On the mask, black conceals and white reveals.
And there's your graduated ND filter, however hard or soft you want, positioned wherever you want and at whatever angle you want. Don't like where it wound up or how soft / hard it was? Just use the gradient tool to re-do it and you've got a fresh new ND filter.
That's all there is to it.
For bonus points, use a big, soft brush instead of the gradient to paint in or out the top layer.
For super extra bonus points, use more than two exposures and selectively mask in or out bits from each of them...and there's your HDR.
The attached image I did like that some years ago. If I remember right, it's three exposures. Classic 5D with the original TS-E 24, at the bottom of Muir Woods. It's probably time for me to re-visit this one...I can do better today, I think....
Cheers,
b&
Upvote
0
Kernuak said:Personally, I don't like HDR, except on some occasions (there are some good examples). It is far overused in my opinion and in many cases badly (which makes the technique look worse than it is). Putting that aside though, there are many scenes where it just simply doesn't work, such as scenes containing snow to name one example. Also, adding gradients in Lightroom or Photoshop isn't going to recover detail that isn't there in the first place. If the sky is blown, then gradients are a waste of time, at best, you'll get bright white areas, at worst, you may also get weird colour casts. It's far better to use a grad (or two) to preserve the detail, even if it isn't quite enough, so that the detail is there for recovery in processing.
You misunderstand me.
The gradients aren't of colors or curves or whatever.
The gradients are in the mask and allow you to choose which portions of which exposure are seen.
Take one exposure -2 EV. That's your sky. Take another exposure +2 EV. That's your foreground. Put the +2EV on the bottom layer and the -2 EV on the top layer. Add a mask to the -2 EV layer. On that mask, add a gradient that results in solid white at the top, solid black at the bottom, and a transition gradient somewhere between. How wide the transition, where to place it, and what angle to place it at define the characteristics of your virtual graduated ND filter.
Now, imagine you've got a scene with grass in the foreground, a patch of bright snow in the middle ground, dark (shadowed, forested) mountains in the background, blue sky, and a few bright puffy clouds. No way are you going to get that all in a single exposure with any ND filter ever made, but that's not a problem. Shoot multiple exposures, one for each part of the scene. Then, create your own custom ND filter in post using layer masks.
Of course, this assumes you know something of at least the basic principles of Zone exposure. You wouldn't want your exposure for the snow to put it at middle gray; you'd want it as bright as you can get it without clipping. And that shadowed forest needs to be as dark as you can get it without blocking or getting noisy (though you'd probably overexpose it a bit in the scene and pull it in post). The grass and sky, of course, should be close to middle gray, and the clouds should probably come from the same exposure as the snow.
Then, the challenge in post is nothing more than creating the proper masks for each of the layers.
Cheers,
b&
Upvote
0
To me there is nothing better than getting the best RAW in camera on location. I calculate the f stop difference between highlight and foreground, apply the appropriate grad and I have the perfect file as the light was on location. No messing in front of a PC.
Upvote
0
jondave said:charlesa said:Not strictly true, I bought the Big Stopper and a hard graduated set together with a holder and 82 mm wide angle adapter this week, I contacted Lee themselves and they pointed to their dealers in the EU, it was paid for on Monday, shipped on Tuesday and arrived on Thursday across the EU.
From which retailer did you get yours?
Conns Cameras in Ireland.
Upvote
0
TrumpetPower! said:You could do that and I have blended in the past, but I don't really have the patience for sitting editing, I'd rather use my patience waiting for lightKernuak said:Personally, I don't like HDR, except on some occasions (there are some good examples). It is far overused in my opinion and in many cases badly (which makes the technique look worse than it is). Putting that aside though, there are many scenes where it just simply doesn't work, such as scenes containing snow to name one example. Also, adding gradients in Lightroom or Photoshop isn't going to recover detail that isn't there in the first place. If the sky is blown, then gradients are a waste of time, at best, you'll get bright white areas, at worst, you may also get weird colour casts. It's far better to use a grad (or two) to preserve the detail, even if it isn't quite enough, so that the detail is there for recovery in processing.. Slightly illogical maybe, but it's probably that I've had enough of sitting in front of a computer at work.
You misunderstand me.
The gradients aren't of colors or curves or whatever.
The gradients are in the mask and allow you to choose which portions of which exposure are seen.
Take one exposure -2 EV. That's your sky. Take another exposure +2 EV. That's your foreground. Put the +2EV on the bottom layer and the -2 EV on the top layer. Add a mask to the -2 EV layer. On that mask, add a gradient that results in solid white at the top, solid black at the bottom, and a transition gradient somewhere between. How wide the transition, where to place it, and what angle to place it at define the characteristics of your virtual graduated ND filter.
Now, imagine you've got a scene with grass in the foreground, a patch of bright snow in the middle ground, dark (shadowed, forested) mountains in the background, blue sky, and a few bright puffy clouds. No way are you going to get that all in a single exposure with any ND filter ever made, but that's not a problem. Shoot multiple exposures, one for each part of the scene. Then, create your own custom ND filter in post using layer masks.
Of course, this assumes you know something of at least the basic principles of Zone exposure. You wouldn't want your exposure for the snow to put it at middle gray; you'd want it as bright as you can get it without clipping. And that shadowed forest needs to be as dark as you can get it without blocking or getting noisy (though you'd probably overexpose it a bit in the scene and pull it in post). The grass and sky, of course, should be close to middle gray, and the clouds should probably come from the same exposure as the snow.
Then, the challenge in post is nothing more than creating the proper masks for each of the layers.
Cheers,
b&
Upvote
0
Similar threads
- Replies
- 0
- Views
- 876
- Replies
- 0
- Views
- 714