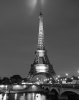
its stretched out, but that might work for you. check the stairs in the bottom left and the tree.
ray, you are over thinking this buddy. you have a rectangle A, and you want it to be a rectangle B. forget the numbers. how do you make one rectangle into a different shaped rectangle?
ADD some material (white space to cut off, cloned sky, black silhouette if possible)
SUBTRACT some material (crop to the correct aspect)
STRETCH it (only works with some subjects)
if you wanted a tall narrow print and you took a wide thin panorama, what would you need to fix it? think about it. the differences between your picture and the available print sizes are smaller, but no different.
PS: metal prints are available in any shape or size you want. even custom shapes. try a different source maybe. regardless, it will look great, black and white night shots look amazing on aluminum.
http://www.adoramapix.com/app/products/metalprints
8x12 is 29.99 i think...