Updated with revised procedure (in blue) January 3, 2017
I've noticed a fair number of posts on using FoCal, so I thought I'd share my technique. I’ve been using FoCal since it was in beta and over the course of time, through lots of trial & error, I’ve figured out how to reliably calibrate long lenses and fast lenses. Here’s how I do it:
Use Automatic Focus Calibration (previously known as "Manual Mode"): The automated mode has never given me reliable results, at least with fast or long lenses. It takes longer, seems to take an inordinate number of extra shots, is not repeatable, and does not result in very good results. For lenses slower than f/2.8, it works really well, though, if your camera supports it.
Do Not Use Back Button AF: As Neuroanatomist helped me discover, Back Button AF does not (reliably or at all) record the AFMA value in the EXIF metadata.
Target Preparation
1. Use the PDF file and print it on matte heavyweight paper at the highest quality settings your printer allows
2. For best results, mount the target on stiff cardboard – I use the protector sheet of cardboard that comes with the paper and use 3M 6090 photo mounting spray to glue them together
Calibration Target Set Up
1. Use your most stable tripod/head combination, legs not extended, and set up roughly 20x to 30x focal length (i.e. 8-12 meters for a 400mm lens) from where you plan to mount the target. I have found that this is the sweet spot – it keeps the target big enough to obtain excellent results and is close enough to average shooting distance and infinity to be accurate in the field. I’ve also found that f/1.2 lenses work best around 20x.
2. Add weight to the tripod – I use a 20lb sandbag
3. Line up the front of your lens to it is as close to parallel to the target as possible. If available, use your camera’s level feature to get the camera perfectly level. A bubble level will do if your camera doesn’t have this feature.
4. Mount the target so it lines up with the center of the target matching the center of the viewfinder. A second person is helpful but not necessary. This usually takes a few tries.
5. Make any minute adjustments (while keeping the camera perfectly level) to get the center point perfectly aligned with the center of the target.
6. Lock the tripod head down tightly
7. Light the target – the brighter the better. I use 2 x Paul C. Buff Einstein lights (with 8” high output reflectors) with the modelling light turned on Full power. The lights should be angled at roughly 30-45 degrees off axis from the target and the target should be lit as evenly as possible.
Camera Set Up
1. Use the viewfinder cover to block light from entering the viewfinder
2. Set camera to:
• Aperture Priority Mode
• Wide open aperture
• ISO 100
• Auto White Balance
• RAW
• +1 EV
• Spot metering
• Timer/remote mode
• Set shutter control to activate AF & AE (this may be disabled if you usually use back-button AF)
• Center point AF
• Mirror-lock up enabled
• Disable IS on the lens
• Also, if you have a newer model, make sure AF is enabled for your focus-by-wire lenses like the 85 f/1.2 II
Calibration
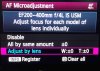
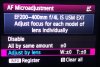
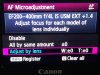
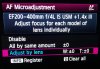
1. Record the current Auto-focus Microadjustment value (AFMA) for the lens
2. Set the AFMA to -20
3. Defocus the lens (towards infinity or minimum focus distance [MFD]) – it doesn’t matter which you use, but I’ve found that using a consistent direction helps
4. Using a cable release or better yet, a wireless remote (like the RC-1 or RC-6), set to 2 or 10 second delay, press the remote shutter button to autofocus the lens and lock up the mirror. After 2 or 10s, the shutter will trip
5. Defocus and take a second shot (2 shots minimum should be used)
6. Repeat steps 3-5 and take shots with the following series of AFMA values: -20, -15, -10, -5, 0, 5, 10, 15, 20 -20, -18, -16, -14, -12, the following x2 (defocus opposite directions) -10 through +10, then +12, +14, +16, +18, +20. Note: the vast majority of lenses fall within -10 to +10, and doing this upfront saves time doing a follow-up calibration.
Analysis and Re-Calibration (if needed)
1. Remove the memory card, download the photos to your PC/Mac
2. Launch FoCal, select the Calibration tab and then choose "Automatic Focus Calibration"
3. Click on Add Files and select the shots you just took
4. When they appear, make sure the AFMA values appear correctly (they should) and that you took all of the shots required
5. Click on Select All
6. Enable “Target Optimization”. Unless you have the lens mounted on a copy stand or a SERIOUS tripod, the camera/lens will move very slightly as you adjust AFMA values - Target Optimization will adjust for that
7. Click Analyze – wait for results
8. After you obtain the results, if the results fall out of the -10 to +10 range, go back and take AFMA shots around the predicted value – i.e. if FoCal says it’s +12, take two additional shots at +11, +12, +13, and +14
9. Return to your PC, download these new files – re-run the analysis with the original files + the new ones.
10. The results will now be as accurate as possible.
11. Save the Report – good to have for later reference
12. Return to camera, set AFMA to FoCal recommended value
Optional Steps
1. Measure target size (in mm) of the strip at the top of the target – input into preferences
2. Determine the white balance of your lights (Einstein modelling lights are 5200K) and input that into the white balance setting
I've noticed a fair number of posts on using FoCal, so I thought I'd share my technique. I’ve been using FoCal since it was in beta and over the course of time, through lots of trial & error, I’ve figured out how to reliably calibrate long lenses and fast lenses. Here’s how I do it:
Use Automatic Focus Calibration (previously known as "Manual Mode"): The automated mode has never given me reliable results, at least with fast or long lenses. It takes longer, seems to take an inordinate number of extra shots, is not repeatable, and does not result in very good results. For lenses slower than f/2.8, it works really well, though, if your camera supports it.
Do Not Use Back Button AF: As Neuroanatomist helped me discover, Back Button AF does not (reliably or at all) record the AFMA value in the EXIF metadata.
Target Preparation
1. Use the PDF file and print it on matte heavyweight paper at the highest quality settings your printer allows
2. For best results, mount the target on stiff cardboard – I use the protector sheet of cardboard that comes with the paper and use 3M 6090 photo mounting spray to glue them together
Calibration Target Set Up
1. Use your most stable tripod/head combination, legs not extended, and set up roughly 20x to 30x focal length (i.e. 8-12 meters for a 400mm lens) from where you plan to mount the target. I have found that this is the sweet spot – it keeps the target big enough to obtain excellent results and is close enough to average shooting distance and infinity to be accurate in the field. I’ve also found that f/1.2 lenses work best around 20x.
2. Add weight to the tripod – I use a 20lb sandbag
3. Line up the front of your lens to it is as close to parallel to the target as possible. If available, use your camera’s level feature to get the camera perfectly level. A bubble level will do if your camera doesn’t have this feature.
4. Mount the target so it lines up with the center of the target matching the center of the viewfinder. A second person is helpful but not necessary. This usually takes a few tries.
5. Make any minute adjustments (while keeping the camera perfectly level) to get the center point perfectly aligned with the center of the target.
6. Lock the tripod head down tightly
7. Light the target – the brighter the better. I use 2 x Paul C. Buff Einstein lights (with 8” high output reflectors) with the modelling light turned on Full power. The lights should be angled at roughly 30-45 degrees off axis from the target and the target should be lit as evenly as possible.
Camera Set Up
1. Use the viewfinder cover to block light from entering the viewfinder
2. Set camera to:
• Aperture Priority Mode
• Wide open aperture
• ISO 100
• Auto White Balance
• RAW
• +1 EV
• Spot metering
• Timer/remote mode
• Set shutter control to activate AF & AE (this may be disabled if you usually use back-button AF)
• Center point AF
• Mirror-lock up enabled
• Disable IS on the lens
• Also, if you have a newer model, make sure AF is enabled for your focus-by-wire lenses like the 85 f/1.2 II
Calibration
1. Record the current Auto-focus Microadjustment value (AFMA) for the lens
2. Set the AFMA to -20
3. Defocus the lens (towards infinity or minimum focus distance [MFD]) – it doesn’t matter which you use, but I’ve found that using a consistent direction helps
4. Using a cable release or better yet, a wireless remote (like the RC-1 or RC-6), set to 2 or 10 second delay, press the remote shutter button to autofocus the lens and lock up the mirror. After 2 or 10s, the shutter will trip
5. Defocus and take a second shot (2 shots minimum should be used)
6. Repeat steps 3-5 and take shots with the following series of AFMA values: -
Analysis and Re-Calibration (if needed)
1. Remove the memory card, download the photos to your PC/Mac
2. Launch FoCal, select the Calibration tab and then choose "Automatic Focus Calibration"
3. Click on Add Files and select the shots you just took
4. When they appear, make sure the AFMA values appear correctly (they should) and that you took all of the shots required
5. Click on Select All
6. Enable “Target Optimization”. Unless you have the lens mounted on a copy stand or a SERIOUS tripod, the camera/lens will move very slightly as you adjust AFMA values - Target Optimization will adjust for that
7. Click Analyze – wait for results
8. After you obtain the results, if the results fall out of the -10 to +10 range, go back and take AFMA shots around the predicted value – i.e. if FoCal says it’s +12, take two additional shots at +11, +12, +13, and +14
9. Return to your PC, download these new files – re-run the analysis with the original files + the new ones.
10. The results will now be as accurate as possible.
11. Save the Report – good to have for later reference
12. Return to camera, set AFMA to FoCal recommended value
Optional Steps
1. Measure target size (in mm) of the strip at the top of the target – input into preferences
2. Determine the white balance of your lights (Einstein modelling lights are 5200K) and input that into the white balance setting
") .
.