Canon will introduce new tilt-shift lenses with a high-megapixel camera [CR2]

Ha. I've been there.

For several years, I was able to get by with my wife thinking I had two lenses, one black one and one white one. But, eventually, that caught up to me. Then I found a better solution.

I started buying her cameras and gradually upgrading them as her skills improved. Eventually it got to the point where she was "borrowing" my lenses and I had to but a second 100-400. Now, she never questions my purchases, but the downside is I have to buy two of everything! To add insult to injury, she's a better bird photographer than I am.
I got caught on my transition from a 6D to a 5DIV only because I forgot not to use the touch screen in front of my partner. Now I just give notice with approximate timeframes, which tends to go better for everyone!
 
  • Haha
Reactions: 1 user
Upvote 0
Several people have queried the uses of lots of MP and wide T/S lenses like a 14mm.
Well... a paying architectural job turned up the other day. Whilst I took a TS-E17/24 and 1.4x (for ~34mm t/s) with the 5Ds I only actually used the 17mm. The client has the aptitude to appreciate wide shots at 50MP give a lot of cropping options for web and promo use - note that some clients also need shots taken with longer lenses to get past suits with zero ability to mentally crop an image (their description, not mine ;-) )
With a few up/down stitches in the mix, I could have happily used an R5, but that's not any significant benefit in this work vs. a working 5Ds. During the work I was thinking of where 14mm would be too wide - not that often if used with care.

I was also thinking of how AF might work.
I took about 120 shots including about 6 with tilt.
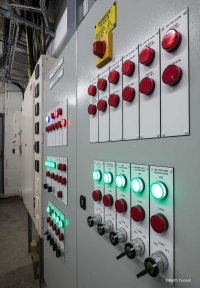
So, for most of my wide TS-E shots I'm using just shift, so 'normal' AF is OK. The tilt shots just needed my tilt tables to give the horizontal offset of the focal plane for sideways tilt - placed along some contol panels in a plant room (about 5 degrees for these shots IIRC ... EXIF would be nice)
For tilt, I look at the Canon patents for some inspiration. There is one in particular where you can specify two points on a plane and the camera will set the tilt and focus to match the focal plane. To do this, the camera needs to know the distance to the two points and work out if it is possible to match the focal plane to what is required. I imagine a version of my normal iterative close tilt focus technique could be used. By having both tilt and focus motorised this would be quite simple.
However, I note that the two point iterative method only works if the rotation of the lens is such that the focal plane matches the plane of the subject. A three point AF for tilt would require the rotation of the lens mount to be motorised as well.
If Canon does go for some more complex AF solution, I eagerly await both its interface design and their attempts at explaining it ;-)
 
Last edited:
  • Like
Reactions: 5 users
Upvote 0
AF will be interesting, as well as how they implement the interface to control it with tilt.

In teaching people the use of tilt and shift, the concept consistently most difficult for even experienced photographers to 'get' is that with tilt the distance scale no longer has a defined meaning with respect to distances. Whereas with shift, you can focus and then add shift -or the other way round. The positioning of the tilted focus plane is dependent on both tilt angle and the setting of the focus ring together. This interaction seems more conceptually difficult, leading to people just randomly changing tilt after focusing or adding tilt and focusing to 'see what happens' Whilst it can work, there is all too often no deeper understanding, making it difficult to repeat effects or apply them consistently in different settings.

Two RF T/S lenses and a body... not cheap. I need more paying work and more people to buy my tilt/shift book ;-)


This from a 2019 patent application
View attachment 197428

from http://www.northlight-images.co.uk/canon-ef-lenses-rumours-and-news/

I don't think the concept is that hard to grasp. What is difficult is visualizing and applying it in the field without trial and error. For sharp images front to back (i.e. landscapes - I use the Canon 24 3.5 II and 50 2.8 TS/E's) I used to focus on the foreground, then tilt until the background was in focus. Then move back to foreground (which would now be out of focus), refocus the foreground, then move back to background (which would now be out of focus) and tilt back in the opposite direction until in focus. Repeat this four or five times (or more), dialing in the ratio of foreground focus to tilt, until everything is in focus. Now I use an app called Tilt Calculator on my phone. Using a combination of focal length, focus distance, vertical distance distance from the ground (or subject) to the lens, and the angle of the camera body (lay the phone against the camera body and the app measures the angle) it calculates the tilt which gets you very close initially. Maybe a quick tweak at times, but it is much, much quicker.
 
Last edited:
  • Like
Reactions: 1 user
Upvote 0
Several people have queried the uses of lots of MP and wide T/S lenses like a 14mm.
Well... a paying architectural job turned up the other day. Whilst I took a TS-E17/24 and 1.4x (for ~34mm t/s) with the 5Ds I only actually used the 17mm. The client has the aptitude to appreciate wide shots at 50MP give a lot of cropping options for web and promo use - note that some clients also need shots taken with longer lenses to get past suits with zero ability to mentally crop an image (their description, not mine ;-) )
With a few up/down stitches in the mix, I could have happily used an R5, but that's not any significant benefit in this work vs. a working 5Ds. During the work I was thinking of where 14mm would be too wide - not that often if used with care.

I was also thinking of how AF might work.
I took about 120 shots including about 6 with tilt.
So, for most of my wide TS-E shots I'm using just shift, so 'normal' AF is OK. The tilt shots just needed my tilt tables to give the horizontal offset of the focal plane for sideways tilt - placed along some contol panels in a plant room (about 5 degrees for these shots IIRC ... EXIF would be nice)
For tilt, I look at the Canon patents for some inspiration. There is one in particular where you can specify two points on a plane and the camera will set the tilt and focus to match the focal plane. To do this, the camera needs to know the distance to the two points and work out if it is possible to match the focal plane to what is required. I imagine a version of my normal iterative close tilt focus technique could be used. By having both tilt and focus motorised this would be quite simple.
However, I note that the two point iterative method only works if the rotation of the lens is such that the focal plane matches the plane of the subject. A three point AF for tilt would require the rotation of the lens mount to be motorised as well.
If Canon does go for some more complex AF solution, I eagerly await both its interface design and their attempts at explaining it ;-)
Great. I’m now going to spend my whole Saturday digging through YouTube watching TS tutorials and architectural photography channels all thanks to this thought-provoking comment.
 
  • Like
Reactions: 3 users
Upvote 0
I don't think the concept is that hard to grasp. What is difficult is visualizing and applying it in the field without trial and error. For sharp images front to back (i.e. landscapes - I use the Canon 24 3.5 II and 50 2.8 TS/E's) I used to focus on the foreground, then tilt until the background was in focus. Then move back to foreground (which would now be out of focus), refocus the foreground, then move back to background (which would now be out of focus) and tilt back in the opposite direction until in focus. Repeat this four or five times (or more), dialing in the ratio of foreground focus to tilt, until everything is in focus. Now I use an app called Tilt Calculator on my phone. Using a combination of focal length, focus distance, vertical distance distance from the ground (or subject) to the lens, and the angle of the camera body (lay the phone against the camera body and the app measures the angle) it calculates the tilt which gets you very close initially. Maybe a quick tweak at times, but it is much, much quicker.
You are lucky in having an idea what to do with regards to tilt... this is not common
I base my note on experience teaching where I have observed a wide variety of 'keep fiddling until it works' techniques ;-)
 
  • Like
Reactions: 3 users
Upvote 0

Sporgon

5% of gear used 95% of the time
CR Pro
Nov 11, 2012
4,719
1,537
Yorkshire, England
Ha. I've been there.

For several years, I was able to get by with my wife thinking I had two lenses, one black one and one white one.
It would be really helpful if Canon made all their lenses in both black and white versions. Then my only lens could always be one or the other colour irrespective of which one of my only lens I bring out, and no one know any different.
Lenses are very much like handbags; you never have enough, though I’ve yet to meet a woman who would comprehend this.
 
  • Haha
  • Sad
  • Love
Reactions: 5 users
Upvote 0
Great. I’m now going to spend my whole Saturday digging through YouTube watching TS tutorials and architectural photography channels all thanks to this thought-provoking comment.
I've a playlist of my T/S related videos if it's of interest?
I've also a T/S index page of articles/ reviews
 
  • Like
  • Love
Reactions: 6 users
Upvote 0

stevelee

FT-QL
CR Pro
Jul 6, 2017
2,383
1,064
Davidson, NC
I don't think the concept is that hard to grasp. What is difficult is visualizing and applying it in the field without trial and error. For sharp images front to back (i.e. landscapes - I use the Canon 24 3.5 II and 50 2.8 TS/E's) I used to focus on the foreground, then tilt until the background was in focus. Then move back to foreground (which would now be out of focus), refocus the foreground, then move back to background (which would now be out of focus) and tilt back in the opposite direction until in focus. Repeat this four or five times (or more), dialing in the ratio of foreground focus to tilt, until everything is in focus. Now I use an app called Tilt Calculator on my phone. Using a combination of focal length, focus distance, vertical distance distance from the ground (or subject) to the lens, and the angle of the camera body (lay the phone against the camera body and the app measures the angle) it calculates the tilt which gets you very close initially. Maybe a quick tweak at times, but it is much, much quicker.
I used the back and forth focus method quite successfully. I was pleasantly surprised how quickly I converged on sharp focus. Maybe I had absorbed enough from Keith that I intuitively started off in good ballpark settings. Sometimes I was surprised by how little tilt I needed.
 
Upvote 0
Upvote 0
I used the back and forth focus method quite successfully. I was pleasantly surprised how quickly I converged on sharp focus. Maybe I had absorbed enough from Keith that I intuitively started off in good ballpark settings. Sometimes I was surprised by how little tilt I needed.
Agreed. If I have my camera at eye level on a tripod using the 24 3.5 II and the sensor plane is perpendicular to the ground, there is very little tilt needed to get the frame sharp from front to back. Using the 50 2.8 at about 1.5 feet above the ground in more intimate scenes with the sensor plane anywhere from 15-20 degrees off perpendicular axis from the ground takes quite a bit more tilt and fiddling back and forth with focus. This is where the Tilt Calculator app really shines.
 
Upvote 0

stevelee

FT-QL
CR Pro
Jul 6, 2017
2,383
1,064
Davidson, NC
Agreed. If I have my camera at eye level on a tripod using the 24 3.5 II and the sensor plane is perpendicular to the ground, there is very little tilt needed to get the frame sharp from front to back. Using the 50 2.8 at about 1.5 feet above the ground in more intimate scenes with the sensor plane anywhere from 15-20 degrees off perpendicular axis from the ground takes quite a bit more tilt and fiddling back and forth with focus. This is where the Tilt Calculator app really shines.
I have rented both the 24mm and the 17mm, and have considered renting longer lenses. But I don't have enough of an idea of what I would do with them to decide which others I might want to try, if any. When and why do you use the 50mm instead of the 24mm? Amy suggestions on what I might want to do with other lenses over a week or two?
 
Upvote 0
Jan 29, 2011
10,675
6,121
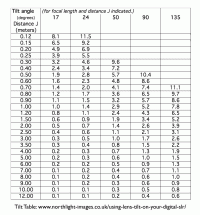
I haven't found the need for a tilt calculator, I use Keith's Tilt Tables and that works well enough given the woefully inadequate tilt range of the Canon TS-E's, compared to traditional tilt angles, and the coarseness of the tilt adjustment and scales.
tilt-table-mixed.gif
 
Last edited:
  • Like
Reactions: 3 users
Upvote 0
Agreed. If I have my camera at eye level on a tripod using the 24 3.5 II and the sensor plane is perpendicular to the ground, there is very little tilt needed to get the frame sharp from front to back. Using the 50 2.8 at about 1.5 feet above the ground in more intimate scenes with the sensor plane anywhere from 15-20 degrees off perpendicular axis from the ground takes quite a bit more tilt and fiddling back and forth with focus. This is where the Tilt Calculator app really shines.
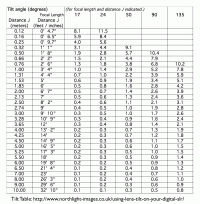
I keep this laminated in my bag

table 17-210.png

It's the lenses I currently can use with tilt. The 35/55/80/210 are Mamiya645 lenses I use with an adapter

It's from a spreadsheet that can be customised to whatever focal lengths you have available. It has the distinct advantage of not needing charging and not needing my reading glasses to use. You can also spot easy to remember values.

So, for example with the TS-E17... If I want the plane of focus (focus ring set at infinity for all values above) to pass 50 cm from the lens [to the side] I need just 2 degrees of tilt.
The plane passes the camera below (ground?) for downwards tilt or any other plane if the lens is rotated

Here's the version with just current Canon lenses from when I was testing the new ones
tilt-table-metric.gif

BTW there is a feet and inches version available ;-)

So, for this example (17), with the lens tilted to the right, the distance from the centre of the camera optical axis was perhaps 40cm (just over a foot) from the plane of the panel.

tilted-panel.jpg

You estimate the distance parallel to the back of the camera, to where it intersects the subject plane.

The tilt table says 2.4 degrees. Now you cant set the lenses that precisely (another question for the RF tilt/shift?) so I take it as a bit over 2 degrees

However, with the camera pointing the way it does, the desired plane cuts across diagonally in front.
Simply changing the focus setting swings the focal plane to run along the panel. Using f/10 reduces vignetting and makes any use of tilt less obvious.

Why the shot? It's for an architectural and design company who had just refurbished a hospital. Most of the job was gleaming new corridors, rooms and machines that go ping, but the various plant rooms needed assorted pics.

This is just one that goes with some flat-on shots - most of which just needed shift. I do ones like this knowing that bits will be chopped out for web/article use - this is where supplying big images also helps give whoever gets the pics of this job (~120) to work with some flexibility.


Oh, and yes, there was a thought that I might have something to use in an article explaining some aspect of tilt/shift ;-)

If I'm honest, I much prefer looking around newly installed plant, than spotless corridors ;-)

heating-pipes.jpg
 
Last edited:
  • Like
Reactions: 4 users
Upvote 0
I have rented both the 24mm and the 17mm, and have considered renting longer lenses. But I don't have enough of an idea of what I would do with them to decide which others I might want to try, if any. When and why do you use the 50mm instead of the 24mm? Amy suggestions on what I might want to do with other lenses over a week or two?
I particularly like the 50mm field of view for landscape/nature images - just a personal preference. That said, I also like the 35mm field of view (I'm not really a wide/super wide user) so if you orient the camera in portrait with the 50 TS attached and stitch the middle, left shifted and right shifted images together, the resulting field of view is about 35mm. The resolution of the stitched image is fairly large which gives cropping/printing options and the 50 TS is sharp edge to edge even when shifted to the max. Generally speaking, the image quality of the 50 TS is outstanding and inspiring. I regularly attach a 1.4x III to give around a 70mm field of view and easily close the IQ gap in post processing. The 50mm is also a macro lens (not sure of the magnification, etc. I just know that you can get pretty close lol) so that adds a little more versatility.
 
Upvote 0
I keep this laminated in my bag

View attachment 197500

It's the lenses I currently can use with tilt. The 35/55/80/210 are Mamiya645 lenses I use with an adapter

It's from a spreadsheet that can be customised to whatever focal lengths you have available. It has the distinct advantage of not needing charging and not needing my reading glasses to use. You can also spot easy to remember values.

So, for example with the TS-E17... If I want the plane of focus (focus ring set at infinity for all values above) to pass 50 cm from the lens I need just 2 degrees of tilt.
The plane passes the camera below (ground?) for downwards tilt or any other plane if the lens is rotated

Here's the version with just current Canon lenses from when I was testing the new ones
View attachment 197501

BTW there is a feet and inches version available ;-)

So, for this example (17), with the lens tilted to the right, the distance from the centre of the camera optical axis was perhaps 40cm (just over a foot) from the plane of the panel.

View attachment 197502

You estimate the distance parallel to the back of the camera, to where it intersects the subject plane.

The tilt table says 2.4 degrees. Now you cant set the lenses that precisely (another question for the RF tilt/shift?) so I take it as a bit over 2 degrees

However, with the camera pointing the way it does, the desired plane cuts across diagonally in front.
Simply changing the focus setting swings the focal plane to run along the panel. Using f/10 reduces vignetting and makes any use of tilt less obvious.

Why the shot? It's for an architectural and design company who had just refurbished a hospital. Most of the job was gleaming new corridors, rooms and machines that go ping, but the various plant rooms needed assorted pics.

This is just one that goes with some flat-on shots - most of which just needed shift. I do ones like this knowing that bits will be chopped out for web/article use - this is where supplying big images also helps give whoever gets the pics of this job (~120) to work with some flexibility.


Oh, and yes, there was a thought that I might have something to use in an article explaining some aspect of tilt/shift ;-)

If I'm honest, I much prefer looking around newly installed plant, than spotless corridors ;-)

View attachment 197503

"So, for example with the TS-E17... If I want the plane of focus (focus ring set at infinity for all values above) to pass 50 cm from the lens I need just 2 degrees of tilt."

Isn't J the vertical distance measured from the camera lens straight down to where it intersects the focal plane? I assume you are referencing the 0.50 in the far left column of the chart (Distance J) when mentioning passing the plane of focus 50cm from the lens.
 
Upvote 0
"So, for example with the TS-E17... If I want the plane of focus (focus ring set at infinity for all values above) to pass 50 cm from the lens I need just 2 degrees of tilt."

Isn't J the vertical distance measured from the camera lens straight down to where it intersects the focal plane? I assume you are referencing the 0.50 in the far left column of the chart (Distance J) when mentioning passing the plane of focus 50cm from the lens.
Thanks - I should have written "50cm to the side of the lens" to make this clearer - just added this

J is the distance in the direction of tilt, so in this case, with the lens tilted to the right the focal plane (at infinity focus) is to the right of the camera. It is only down when the lens is tilted downwards (such as to run the plane along the ground).

It is actually the distance from the centre of the lens on the optical axis of the camera. Now, with complications as to what counts as the centre of the lens, these tables become increasingly awkward to use at short J distances

As a result, at short distances I use them as giving me a starting point for tilt

For close up and more precise work I switch to an iterative approach as described here


Or, for even more precision with an arbitrary plane

 
  • Like
Reactions: 1 user
Upvote 0
Jan 29, 2011
10,675
6,121
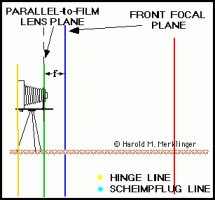
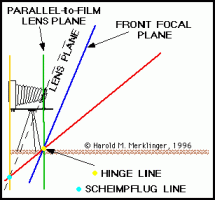
I think it is long past time in this thread for the Merklinger gif's!

The first shows the effect on the plane of focus when tilting a lens, the second what happens to the plane of focus when a tilted lens' focus is changed.

The first is what everybody means when they say the Scheimpflug Principle because that is what it is, the second is the really cool part, changing focus, that most people don't 'get'.

ViewCam2.gifViewCam.gif
 
Last edited:
  • Like
Reactions: 7 users
Upvote 0
Actually, i don't get it. Why do i need AF in my TS lense?
The fun of shooting with a TS lense is to have full control of everything. How is AF making a TS better? I mean: i want to decide what is in focus. AF isn't able to decide how i want to compose my picture.
I'm happy with my TS-E 45 and my TS-E 24 II on my EOS R.
 
Upvote 0