Fairly new piece of text by Bob DiNatale -> http://www.luminous-landscape.com/essays/the_optimum_digital_exposure.shtml
Tags: Exposure, ETTR, Metering, M.A.P., Noise
Tags: Exposure, ETTR, Metering, M.A.P., Noise
You're welcome.AcutancePhotography said:Thanks for posting it. Lotta good stuff on that site.
Orangutan said:Seems like a long-winded way of saying "expose high, process low." I already use this method when I have time, and I have one quibble with his explanation: the goal, for me at least, is not to put the brightest areas at 99+% exposure, but to put the brightest areas I care about at 99+% exposure. In some cases I'm willing to allow some areas to blow-out, either because they're too small to affect the final image or because it's a trade-off I'm willing to make for the rest of the image.
And let me see if I can avoid derailment of the thread: sensor DR irrelevant here because no matter how much DR you have (current sensor tech) you can still apply these principles to optimize your exposure. Can we please not argue about sensor DR in this thread?
wtlloyd said:I've got an argument about that...
")
Orangutan said:Seems like a long-winded way of saying "expose high, process low." I already use this method when I have time, and I have one quibble with his explanation: the goal, for me at least, is not to put the brightest areas at 99+% exposure, but to put the brightest areas I care about at 99+% exposure. In some cases I'm willing to allow some areas to blow-out, either because they're too small to affect the final image or because it's a trade-off I'm willing to make for the rest of the image.
And let me see if I can avoid derailment of the thread: sensor DR irrelevant here because no matter how much DR you have (current sensor tech) you can still apply these principles to optimize your exposure. Can we please not argue about sensor DR in this thread?
dilbert said:privatebydesign said:Though I have found that well over exposed very subtle evening skies cannot be lowered to accurately reflect the tonality of a more traditionally exposed shot, I have never learnt why.
What software are you using?
StudentOfLight said:Photography is a complex, creative process. To proclaim axioms as if everyone has the same creative goal is more than a little <please insert appropriate term because I'm a loss for words>.
Orangutan said:Seems like a long-winded way of saying "expose high, process low." I already use this method when I have time, and I have one quibble with his explanation: the goal, for me at least, is not to put the brightest areas at 99+% exposure, but to put the brightest areas I care about at 99+% exposure. In some cases I'm willing to allow some areas to blow-out, either because they're too small to affect the final image or because it's a trade-off I'm willing to make for the rest of the image.
privatebydesign said:Though I have found that well over exposed very subtle evening skies cannot be lowered to accurately reflect the tonality of a more traditionally exposed shot, I have never learnt why.
Sporgon said:privatebydesign said:Though I have found that well over exposed very subtle evening skies cannot be lowered to accurately reflect the tonality of a more traditionally exposed shot, I have never learnt why.
That is what I find, and I believe the reason that that we are losing accuracy with that level of over exposure, especially saturation.
I remember the original article produced by LL in 2002 regarding over exposure to achieve an improved raw file, and in those days they were dealing with( no surprise), digital tech from 2002, where tonal transition was poor compared with film, especially with CMOS, which was (IMO) inferior to CCD at that time. They were referring to the fact that if you did not have data recorded in the top one fifth of the histogram you were losing fifty percent of the potential information., which is correct in theory, but, doesn't deal with lose of accuracy and saturation.
It is now generally accepted that to maximise the IQ potential in a scene that includes bright and dark you want to pull the recorded data across to the right as much as much as possible in order to preserve information in the dark areas, allowing specular highlights to blow etc; it's all sound practice.
There is a benefit from over exposing a relatively small amount and then bringing the raw file back down in post. Look at the effect of pulled ISOs on SNR on some cameras.
However in the recent article, suggesting that the optimum exposure for the black cat is the one on the right is just a load of bull. You might get away with it when the majority of the tones are black, but that doesn't mean it is sound technique.
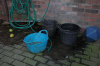
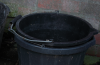
I took a couple of comparison shots to try and show what I mean, and have incorporated blue as it helps with the difference.
The first picture (ending 5) is exposed using settings determined by an incident light meter. The matrix metering of the camera was wanting to overexpose by two thirds of a stop more.
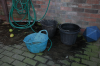
The second picture (ending in 6) is over exposed from the 'correct' exposure by two full stops. This was then reduced by two stops before converting the raw to 16 bit TIFF. Even with the pictures reduced for web display you can ( hopefully, I haven;t seen them yet of course) see the difference in the blue.
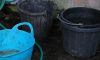
In the second two images, both at 50%, I have applied the appropriate curves and saturation, and then balanced the lesser exposed one in levels to equal them up. The loss of saturation in the blue bucket is clear, and I cannot get it back to being identical.
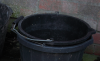
The final two images are at 100% of the black buckets and there is no difference in 'IQ' or noise. Overall the correctly exposed image is the better one.