14mm mk2 or 16-35 mk2?

Status
Not open for further replies.
privatebydesign said:
Eldar said:
eml58 said:
privatebydesign said:
I did, I used two 14mm L's, both were a huge disappointment, I ended up getting the TS-E 17 and couldn't be happier, it is in a league all its own for landscape work, considerably better than either the 14 or 16-35. A two stitch 17 image using shift gives you an 11mm fov.

Completely agree with this.


I own the 14f/2.8 II & 16-35f/2.8 II, plus the Zeiss 15f/2.8, I think the Zeiss (Although Manual Focus) is ahead of the Canon 14 & 16-35 in IQ, The 17TSE II is just an amazing Lens (Also Manual Focus)
+1
I had the 14 and sold it. I have kept the 16-35 II, but I hardly ever use it. Last week I bought the 17 TS-E and played with it over the weekend. What a lens!! I have not looked at the filter solutions yet, but it seems there are alternatives that´s working.

Eldar, like eml58 I recently got the Fotodiox Wonderpana. It is very well made and the perfect solution for round filter use, I only got the CPL as that was all I really missed. The complimentary additional 66 "ears" for grad filter use are not a good design, you can't rotate them on the Wonderpana so have limited functionality. BUT Fotodiox just, within the last couple of days, announced a rotation monut for the 66 ears, if you need grad filter use I'd hold off until they also bring those to market for the 17, at the moment they only make them for the Nikon 14-24.

The big advantage of the Wonderpana over the much touted Lee system and home made work arounds is the Wonderpana allows full movements without vignetting.

I used to use lee grad filters heavily. My thoughts were, if Digital has a simular DR to slide, then slide methodologies were the way forward. I had hard, medium and soft grads, plus most of the stripe set and coloured grads. Then I learnt that I could use solid ND's to take two shots, one exposed for the sky and one exposed for the foreground. On a tripod naturally, with no movment between shots. I could decouple the need to shoot everything in one frame and then combine them in Photoshop later using layers and a soft brush. It totally revolutionised my landscape work and now I can shoot with less gear and better results. If I need a curved ND grad or a wobbly line grad....it's just a matter of post prod. Generally, it's a better technique and takes a lot less time over all to get great results.
I sold all my Lee gear (for a profit!) and bought a 16-35IIL out of the cash I accumulated. A double win in my books.
When I sourced potential filters for the TS-e 17L, a polariser and ND filters were my priority.
 
Upvote 0
Jan 29, 2011
10,673
6,120
nightbreath said:
privatebydesign said:
The point is when choosing a lens, colour rendering and contrast are so easily adjusted now they shouldn't be an important factor in purchasing decisions.
It seems we're still on different pages. I have mentioned "vision", because I see difference in the original file. I have attached an example. Let me attach a sample photo later :)

It would be great if you could add sample photos too.

Ok, here is what I am talking about. I just did these images quickly for this thread, I used complete auto settings if I wanted more accuracy I could go into the calibration software and customise it to my hearts content.

I took two pictures of the same colour card in the same place, one with an EOS-M and compact fluorescent light bulb, the second with a 1Ds MkIII, 24-70 and a 600EX-RT. Those are the two left hand images, I then calibrated them and white balanced them and those two pictures are the two on the right. I think you will agree the two on the left are vastly dissimilar with very different colour characteristics, but the two on the right are very similar. This is not just a WB adjustment, the colour swatches change in relation to each other too.

I did not touch exposure, obviously the two images have a slightly different exposure as well.
 

Attachments

  • 2.jpg
    2.jpg
    235.6 KB · Views: 619
  • 1.jpg
    1.jpg
    238.3 KB · Views: 629
Upvote 0

scottkinfw

Wildlife photography is my passion
CR Pro
Lovely!

Thank you.
I got mine today, and took a couple of test shots to be sure I didn't get a "lemon", given reports of quality control issues. I can't wait to try it out this weekend.

sek

Frodo said:
scottkinfw said:
Seems like a low risk proposition- not a lot of money if not used much. Can you post some pics and tell me what you think are strong points and weak points please?

Two photos attached:
Strong points
- Sharpness (especially no coma (important for star shots) and little CA) - apparently best in class
- Silky focusing

Weak points:
- Manual everything (but you knew that)
- Not sure how robust it is, e.g. mount attached by just three screws. My focusing ring partially seized on me during a trip to Europe, effectively making the lens unusuable other than at infinity. I don'tknow what happened, i.e. I didn't drop it. It was replaced under warranty.

Non-point:
- Distortion. Quite a few gripes about distortion but I find that LR correction to be excellent with little loss of image area.

 
Upvote 0

scottkinfw

Wildlife photography is my passion
CR Pro
Nightbreath- where may I see your pics?

nightbreath said:
privatebydesign said:
As for pro looking output, look up Brooke Shaden who uses a 50 f1.8 almost exclusively, or Lou Freeman who uses a 70-300 for much of her work. There are countless people putting out superlative work with comparatively modest gear.
I'm a seasoned photographer. From my point of view images that don't have middle shadows (I have looked through their portfolio) do not conform the "semi-competent" workflow expected results ;)
 
Upvote 0
Sep 12, 2012
70
0
Since the idea of stitching 2 or more photos from a 17mm TS-E to create a landscape picture of 11mm FOV has come up several times in this thread, I have a question for those of you who have done this.

Obviously, it is better to clamp the lens to the tripod, so the camera, not the lens, physically moves when the lens is shifted - but for landscape work, is this necessary? Is there a dividing distance where you'd start to see an improvement if you clamped the lens?

Thanks in advance for any advice.
 
Upvote 0
Jan 29, 2011
10,673
6,120
scottkinfw said:
Nightbreath- where may I see your pics?

nightbreath said:
privatebydesign said:
As for pro looking output, look up Brooke Shaden who uses a 50 f1.8 almost exclusively, or Lou Freeman who uses a 70-300 for much of her work. There are countless people putting out superlative work with comparatively modest gear.
I'm a seasoned photographer. From my point of view images that don't have middle shadows (I have looked through their portfolio) do not conform the "semi-competent" workflow expected results ;)

His site is here свадебный фотограф днепропетровск http://luxuryphoto.com.ua/
 
Upvote 0
Jan 29, 2011
10,673
6,120
Deva said:
Since the idea of stitching 2 or more photos from a 17mm TS-E to create a landscape picture of 11mm FOV has come up several times in this thread, I have a question for those of you who have done this.

Obviously, it is better to clamp the lens to the tripod, so the camera, not the lens, physically moves when the lens is shifted - but for landscape work, is this necessary? Is there a dividing distance where you'd start to see an improvement if you clamped the lens?

Thanks in advance for any advice.

Hi Deva,

The value of clamping the lens and not the camera is vastly overstated, in my experience parallax is not an issue. But, it is much easier to shift the camera on a rail or plate to counteract the lens shift than to try to clamp the lens if parallax became an issue. Just a normal Arca Swiss style body plate gives you the 24mm max needed to do this. Method 2 at this link.

http://www.outbackphoto.com/workflow/wf_58/essay.html

I would point out that the illustration of parallax error they give in this article was not created using that setup and in my experience parallax just isn't an issue with the TS-E17 and modern software, it doesn't blend as much as choose one or the other, but anyway, if you want to parallax is entirely avoidable very easily.
 
Upvote 0
privatebydesign said:
nightbreath said:
privatebydesign said:
The point is when choosing a lens, colour rendering and contrast are so easily adjusted now they shouldn't be an important factor in purchasing decisions.
It seems we're still on different pages. I have mentioned "vision", because I see difference in the original file. I have attached an example. Let me attach a sample photo later :)

It would be great if you could add sample photos too.

Ok, here is what I am talking about. I just did these images quickly for this thread, I used complete auto settings if I wanted more accuracy I could go into the calibration software and customise it to my hearts content.

I took two pictures of the same colour card in the same place, one with an EOS-M and compact fluorescent light bulb, the second with a 1Ds MkIII, 24-70 and a 600EX-RT. Those are the two left hand images, I then calibrated them and white balanced them and those two pictures are the two on the right. I think you will agree the two on the left are vastly dissimilar with very different colour characteristics, but the two on the right are very similar. This is not just a WB adjustment, the colour swatches change in relation to each other too.

I did not touch exposure, obviously the two images have a slightly different exposure as well.
As I said before, it's not about calibration. It's all about how far you can go from your initial state.

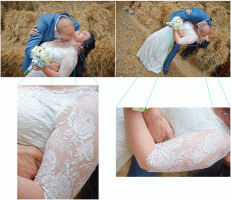
Below is a sample comparison (2 old images taken with 2 different high-end equipment sets):
- left-hand side image is worse for me, because I cannot push the colors further than they are (e.g., I can't make the whites whiter on the dress, because specific areas are burnt out due to initial color corrections);
- right-hand side image looks nicer to me as it gives a feeling of richer tonal gradations; those cyan and orange colors add some kind of luminance to the image, and the whites look whiter without being burnt out.

sample_1.jpg


I understand that in this case the difference is minuscule. But if I don't have the first image limiting me, I would be able to go further with the second one. On the left side the main image lacks additional colors from the right image (cyan and orange). Let me demonstrate how pushing specific colors to a ppleasible end point works on both images:

sample_2.jpg


This difference is not something I've noticed once, equipment is one of three variables in the equation we all having troubles with (IQ = photographer + environment + equipment). In the end I get a cheap-looking left image compared to something I want to get on the right-hand side. Needless to say, the workflow for achieving these looks differs – image on the right is something that is much easier to get than the left-hand image that ends up being worse to my eye (because of the interfering colors).

Color calibration was something I did when I opened photography for myself, a few years after I figured out that it's meaningless for me.
 

Attachments

  • sample.jpg
    0 bytes · Views: 143
Upvote 0
Jan 29, 2011
10,673
6,120
First let me tell you what I see in your two images.

Most glaringly they have different exposures (not camera exposures, actual illuminant exposures); the dress on the left has bad magenta and purple fringing, indicative of a lens issue, it isn't traditional CA but I suspect you have an element alignment issue. Further, his suit is a completely different colour in both images.

Looking at the two images from an analytical eye I'd say they give the symptoms of a misfiring flash, one light has thrown a different colour temp light on the subject.

Anyway, I have removed the magenta and purple fringing, I have adjusted the tone curve to maintain contrast but get the dresses to the same level, there are no more blown pixels in either image, and I have made his suit the same colour, but as it doesn't have the same light from the top it doesn't have the contrast, neither does het arm because in the left image it is in her shade and in the right image it isn't.

All in all very workable for somebody with a competent digital workflow, I have made good corrections for a small jpeg, had I had the RAW files I could nail it in very little time.

Most importantly from your perspective the dresses are now the same colour and illumination, you can play with your tone curve as much as you want to get contrast and detail in either now.

My point is all the information is in the files, you are just reassigning values, that is all calibration does, had you used camera calibration in your workflow then at the very least hios suit would have been the same colour in both frames.

First image is my rework, second image is a gif alternating between yours and mine to illustrate the differences. Because of the way our eyes work yours looks way to magenta and mine looks way to yellow in the gif.
 

Attachments

  • sample_1b.jpg
    sample_1b.jpg
    258.1 KB · Views: 663
  • 1.gif
    1.gif
    575.8 KB · Views: 668
Upvote 0
eml58 said:
privatebydesign said:
I did, I used two 14mm L's, both were a huge disappointment, I ended up getting the TS-E 17 and couldn't be happier, it is in a league all its own for landscape work, considerably better than either the 14 or 16-35. A two stitch 17 image using shift gives you an 11mm fov.

Completely agree with this.

I own the 14f/2.8 II & 16-35f/2.8 II, plus the Zeiss 15f/2.8, I think the Zeiss (Although Manual Focus) is ahead of the Canon 14 & 16-35 in IQ, The 17TSE II is just an amazing Lens (Also Manual Focus), and I just added the Wonderpana Filter Holder from Fotodiox to it, so now I can use my Lee Filters, so it's become even more usable.

Only real issue with the Zeiss is it cant be used with Filters, at least I cant work out how it could be done, but it has excellent IQ. I mostly now use the Canon 14 & 16-35 for my Underwater Imaging where I find the small issues that both Lenses seem to have are not so prominent.

emi58, I am envious of your 15/2.8 Zeiss. I have seen many wonderful photos taken with this lens. At $3000 it is a little beyond my budget at this time, but maybe one day. I have the Samyang 14mm and it is a pretty good lens, but the Zeiss is in my wish list.
 
Upvote 0
privatebydesign said:
Because of the way our eyes work yours looks way to magenta and mine looks way to yellow in the gif.
My personal feeling is that you can achieve either magenta or yellow result with the left RAW file, but not the orange I have achieved with the right file. Do you want me to send you the RAW files over to play with? :)
 
Upvote 0
Jan 29, 2011
10,673
6,120
nightbreath said:
privatebydesign said:
Because of the way our eyes work yours looks way to magenta and mine looks way to yellow in the gif.
My personal feeling is that you can achieve either magenta or yellow result with the left RAW file, but not the orange I have achieved with the right file. Do you want me to send you the RAW files over to play with? :)

No need for the RAW file, and thanks for continuing in a civil manner, too often these discussions descend into insults. I appreciate a true conversation :)

Anyway, here I have pushed the yellow to orange, way further than your right image, just to make a point you don't have to choose yellow or magenta, you can have orange if you want. I did this in the ACR Camera Calibration panel only, just hue and saturation on the three channels. I believe your discontent between the two capture systems could be mitigated to effectively nothing if you readopt a robust calibration inclusive workflow.
 

Attachments

  • 1c.jpg
    1c.jpg
    133.4 KB · Views: 377
Upvote 0
Status
Not open for further replies.