Here's what I was able to do with Aperture 3.2.3... differing from above in the use of the "Black Point" adjustment to eliminate the crushed blacks in the corner, a slight bump in exposure to move the whole histogram to the right slightly, and the shadow "Radius" adjustment to eliminate the dark shadow transition/halo effect, and a slight white balance adjustment to give it a more neutral tone.
I didn't even come close to maxing out the shadow slider... there's still plenty of room to move here, but the contrast starts to suffer.
I then used a dodge brush on top of all this to write my alias.
Bottom line, there is WAAAY more dynamic range in these RAW's than I ever thought possible.

Larger size: http://chrismccormack.zenfolio.com/img/s3/v45/p611876565.jpg

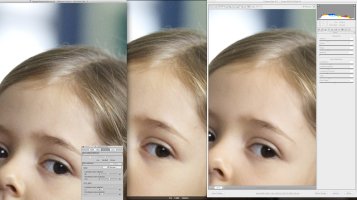
Here's a 100% crop of the dark corner area...

Larger size: http://chrismccormack.zenfolio.com/img/s3/v38/p744623374.png
Here's the same area after applying Nik Dfine NR and a tad bit of sharpening...

Larger size: http://chrismccormack.zenfolio.com/img/s3/v41/p562140851.png
Matt... you need to sweep the walk!
I didn't even come close to maxing out the shadow slider... there's still plenty of room to move here, but the contrast starts to suffer.
I then used a dodge brush on top of all this to write my alias.
Bottom line, there is WAAAY more dynamic range in these RAW's than I ever thought possible.
Larger size: http://chrismccormack.zenfolio.com/img/s3/v45/p611876565.jpg
Here's a 100% crop of the dark corner area...
Larger size: http://chrismccormack.zenfolio.com/img/s3/v38/p744623374.png
Here's the same area after applying Nik Dfine NR and a tad bit of sharpening...
Larger size: http://chrismccormack.zenfolio.com/img/s3/v41/p562140851.png
Matt... you need to sweep the walk!
Upvote
0


") This is the first time I used it! Up till now I just shot standard pictures with max ISO 400 ... or 800 at most. This camera makes me want to stretch the time!
This is the first time I used it! Up till now I just shot standard pictures with max ISO 400 ... or 800 at most. This camera makes me want to stretch the time!") ) owner of a 5DM3, and I'm trying to wrap my head around the chatter on the raw processors out there. I've understood (as this thread points out) that one can get a long way in shadow recovery with quite a few of the processors out there. What I'm wondering is if you guys have made any new discoveries regarding the softness of the pictures produced by the new Adobe 2012 raw engine (LR 4.1 RC)? I've seen some example images from a similar thread showing that LR produces sharper images from the 5DM2 compared to 5DM3, but when using DPP (Canon software) the sharpness from 5DM3 is stellar.
) owner of a 5DM3, and I'm trying to wrap my head around the chatter on the raw processors out there. I've understood (as this thread points out) that one can get a long way in shadow recovery with quite a few of the processors out there. What I'm wondering is if you guys have made any new discoveries regarding the softness of the pictures produced by the new Adobe 2012 raw engine (LR 4.1 RC)? I've seen some example images from a similar thread showing that LR produces sharper images from the 5DM2 compared to 5DM3, but when using DPP (Canon software) the sharpness from 5DM3 is stellar.