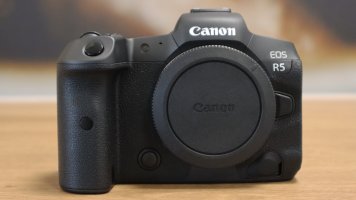
Side by side comparison of the Canon EOS R5, Canon EOS R and Canon EOS RP

usern4cr

R5
CR Pro
Sep 2, 2018
1,376
2,308
Kentucky, USA
---

Well ... If I was a Wiseguy, I'd be saying Ya Gotta Keep QUIET about all my previous posts !!!! Omerta! ;-) :) ;-)

... OR ....

you could just take EVERYTHING I say with 20,000 grains of salt!

THIS IS THE INTERNET AFTER ALL AND I AM A CAT TYPING AWAY AT MY LONESOME KEYBOARD !!!

V
The thing that gets me is that your posts can be so informative, well written and funny that I assume that they're true and proceed to comment profusely - so much that I should be reminded that "assume" can be make an "ass" out of "u" and "me" (it's the "me" part that's most embarrassing).

Then, instead of assuming everything you post is there as a fun ruse, you might (& probably do) write things that are informative, well written, funny, and also true. Then I just don't know what to think.

So, I think about 20,000 grains of salt should do. Enjoy! :cool:
 
Last edited:
Upvote 0

pj1974

80D, M5, 7D, & lots of glass and accessories!
Oct 18, 2011
691
211
Adelaide, Australia
I would have preferred a photos without a lens mounted to the camera. Am I right that the R5 has a depth control button on the front whereas the R and RP don‘t have one?

There are a lot of images on the internet with the R5, here's a large photo of a closeup with a lens attached.
https://www.dpreview.com/files/p/articles/4115083276/EOS_R5_-_front.jpeg

There is a button on the front of the R5, probably programmable - for depth of field and other functions.

And I am pasting another image of the R5 in this post, just below here

1588038939869.jpeg

Additionally, Canon also has released a video with the R5 rotating, I can't find it now - but if you search for it, I expect you'll find it.
But here's a useful little video made last month from Canon about the R5.

 
  • Like
Reactions: 1 user
Upvote 0
The thing that gets me is that your posts can be so informative, well written and funny that I assume that they're true and proceed to comment profusely - so much that I should be reminded that "assume" can be make an "ass" out of "u" and "me" (it's the "me" part that's most embarrassing).

Then, instead of assuming everything you post is there as a fun ruse, you might (& probably do) write things that are informative, well written, funny, and also true. Then I just don't know what to think.

So, I think about 20,000 grains of salt should do. Enjoy! :cool:

---

Now about that frame grabbing thing .... Give it a try!


Set your Canon to 24 fps at 10 bits per colour channel or higher and at a high bit rate (i.e. at least 75 megabits to 150 megabits per second or more!) and use CLOG, CLOG2 or CLOG3 dynamic range preservation recording (i.e. do not use a burned in LUT!)

Capture your video at full 24 fps DCI 4K or DCI 8K. (or UHDTV 4K/8K)

Load into Blackmagic Resolve, Adobe Premiere, Final Cut Pro, Corel Videostudio, etc.

If you are NOT using a pre-defined LUT (i.e. Cinema-oriented Colour Lookup Table), then go into the luminance levels adjustment section of your colour correction screen and raise your deep shadows by 10% to 15% until you just START BARELY start seeing the fine details in dark shadowy rocks, tree bark, details in shadowy human faces, bricks, road pavement, etc. You just need to barely start seeing those fine details, then back of a tiny bit so you preserve a WIDE latitude from dark to bright in your captured footage.

For your bright highlights, actually REDUCE THEM by about 5% to 10% because Canon tend to record HOT. In the clouds, you should still see puffy white and NOT dull grey and you should STILL see the fluffy fine details of said clouds. You reduce the highlights UNTIL they BARELY start turning grey and then you back off just a smidgen so they still remain white.

For your midtones, your luminance peaks on a waveform monitor should have human faces at around 60% to as much as 80% luminance level (it's a personal preference, BUT you should be able to see the fine pores in a person's face!) For darker-skinned people, you may need to boost to 85% to 90% luminance level in order to see the fine pores.

For your colour temperature, look at a person's face and if it is the more prominent feature in a scene or it is sunset/sunrise then go for a more warm orangey look (i.e. 3200K). If blue sky or landscape is dominant and that is NOT shot at sunset or sunrise then add some icy blue colour temperature at around 6500K.

Canon tends to really MUTE the colours on their CLOG/CLOG2/CLOG3 recorded footage so boost your SATURATION until the sky is truly blue, and clouds are truly white and that faces look natural no matter their skin colour. You need to adjust in small increments until you start seeing blue sky turning to cyan (back off if that happens!) and white fluffy clouds STAY puffy white with subtle light greyish puffs and not an added tinge of red, green, blue, magenta, cyan or yellow!

Once you've got saturation down, you need to DOWNSAMPLE your video using a Bicubic, Sin-C or Lanczos-3 or Lanczos-5 (i.e. best quality!) image resampling filter algorithm (look in filters and resizing options menu!) to exactly HALF the resolution of the original video on the horizontal and vertical axis.

For DCI 8K (8192 by 4320) it goes down to 4096 x 2160 pixels. for original DCI 4K (4096 by 2160 pixels it goes down to 2048 by 1080 pixels. This performs a natural Nyquist-type antialiasing resample making your image look very nice.

Then add a SECOND filter called UNSHARP MASK which just highlights edges slightly to recover the SHARPNESS of your downsampled video frames. You can also add a CONTRAST ENHANCE filter to widen the contrast ratio to your personal preferences --- Just remember that you SHOULD STILL just barely see fine details in shadows and the fine details in bright skies/clouds or the texture of a stucco/tiled ceiling and floor, or the fine pavement surface of a roadway!

Now export your frames as PNG format or BMP format (i.e. uncompressed) 24-bits, 30-bits, 36-bits or 48-bit colour RGB images usable for Adobe Photoshop, Corel Photopaint or whatever else you use as a paint/printing program.

Load your resampled uncompressed PNG or BMP format still image files and either upload them to the web or goto the print menu and print them out!

For printing, set your print menu options to "Fit Image to 8x10 inches", set colour rendering intent type to Perceptual (i.e. Match what is on Display), Use Error Diffusion on print output, and then set your resolution to 1200 dpi or 2400 dpi FINEST QUALITY on your CMYK Canon, Epson or HP inkjet printer and then print on either Semi-Gloss Photo Paper or Full Gloss Photo Paper.

Since printing always uses CMYK light-reflecting inks (Cyan, Magenta, Yellow and Black) rather than being an RGB (Red, Green Blue) emissive light display, it means it is very important to set your RENDERING INTENT or COLOUR MATCHING OPTIONS properly in your paint and print program to ensure what you see on you display is what actually gets printed out, so use PERCEPTUAL COLOUR RENDERING INTENT menu option which on some systems is called MATCH COLOURS TO WHAT IS ON DISPLAY!

Your prints will look STUNNING!

If you use 8K video imagery, you can actually print your frame grab at up to 36 x 24 inches photo glossy paper and STILL have it look really good so long you use the higher quality dots-per-inch print settings and full Error Diffusion settings on your printer. For original 4K video footage, you can print up to 8x10 and have it look good!

Give it a try!

I DEFINITELY know what I'm doing when it comes to print settings and image capture!

V
 
Last edited:
  • Like
Reactions: 1 user
Upvote 0

usern4cr

R5
CR Pro
Sep 2, 2018
1,376
2,308
Kentucky, USA
---

Now about that frame grabbing thing .... Give it a try!


Set your Canon to 24 fps at 10 bits per colour channel or higher and at a high bit rate (i.e. at least 75 megabits to 150 megabits per second or more!) and use CLOG, CLOG2 or CLOG3 dynamic range preservation recording (i.e. do not use a burned in LUT!)

Capture your video at full 24 fps DCI 4K or DCI 8K. (or UHDTV 4K/8K)

Load into Blackmagic Resolve.

If you are NOT using a pre-defined LUT (i.e. Cinema-oriented Colour Lookup Table), then go into the luminance levels adjustment section of your colour correction screen and raise your deep shadows by 10% to 15% until you just START BARELY start seeing the fine details in dark shadowy rocks, tree bark, details in shadowy human faces, bricks, road pavement, etc. You just need to barely start seeing those fine details, then back of a tiny bit so you preserve a WIDE latitude from dark to bright in your captured footage.

For your bright highlights, actually REDUCE THEM by about 5% to 10% because Canon tend to record HOT. In the clouds, you should still see puffy white and NOT dull grey and you should STILL see the fluffy fine details of said clouds. You reduce the highlights UNTIL they BARELY start turning grey and then you back off just a smidgen so they still remain white.

For your midtones, your luminance peaks on a waveform monitor should have human faces at around 60% to as much as 80% luminance level (it's a personal preference, BUT you should be able to see the fine pores in a person's face!) For darker-skinned people, you may need to boost to 85% to 90% luminance level in order to see the fine pores.

For your colour temperature, look at a person's face and if it is the more prominent feature in a scene or it is sunset/sunrise then go for a more warm orangey look (i.e. 3200K). If blue sky or landscape is dominant and that is NOT shot at sunset or sunrise then add some icy blue colour temperature at around 6500K.

Canon tends to really MUTE the colours on their CLOG/CLOG2/CLOG3 recorded footage so boost your SATURATION until the sky is truly blue, and clouds are truly white and that faces look natural no matter their skin colour. You need to adjust in small increments until you start seeing blue sky turning to cyan (back off if that happens!) and white fluffy clouds STAY puffy white with subtle light greyish puffs and not red, green or blue!

Once you've got saturation down, you need to DOWNSAMPLE your video using a Bicubic, Sin-C or Lanczos-3or Lanczos-5 (best!) image resampling filter algorithm (look in filters and resizing options menu!) to exactly HALF the resolution of the original video on the horizontal and vertical axis.

For DCI 8K (8192 by 4320) it goes down to 4096 x 2160 pixels. for original DCI 4K (4096 by 2160 pixels it goes down to 2048 by 1080 pixels. This performs a natural Nyquist-type antialiasing resample making your image look very nice.

Then add a SECOND filter called UNSHARP MASK which just highlights edges slightly to recover the SHARPNESS of your downsampled video frames. You can also add a CONTRAST ENHANCE filter to widen the contrast ratio to your personal preferences --- Just remember that you SHOULD STILL just barely see fine details in shadows and the fine details in bright skies/clouds or the texture of a stucco/tiled ceiling and floor, or the fine pavement surface of a roadway!

Now export your frames as PNG format or BMP format (i.e. uncompressed) 24-bits, 30-bits, 36-bits or 48-bit colour RGB images usable for Adobe Photoshop, Corel Photopaint or whatever else you use as a paint/printing program.

Load your resampled uncompressed PNG or BMP format still image files and either upload them to the web or goto the print menu and print them out!

For printing, set your print menu options to "Fit Image to 8x10 inches", set colour rendering intent type to Perceptual (i.e. Match what is on Display), Use Error Diffusion on print output, and then set your resolution to 1200 dpi or 2400 dpi FINEST QUALITY on your CMYK Canon, Epson or HP inkjet printer and then print on either Semi-Gloss Photo Paper or Full Gloss Photo Paper.

Since printing always uses CMYK light-reflecting inks (Cyan, Magenta, Yellow and Black) rather than being an RGB (Red, Green Blue) emissive light display, it means it is very important to set your RENDERING INTENT or COLOUR MATCHING OPTIONS properly in your paint and print program to ensure what you see on you display is what actually gets printed out, so use PERCEPTUAL COLOUR RENDERING INTENT menu option which on some systems is called MATCH COLOURS TO WHAT IS ON DISPLAY!

Your prints will look STUNNING!

If you use 8K video imagery, you can actually print your frame grab at up to 36 x 24 inches photo glossy paper and STILL have it look really good so long you use the higher quality dots-per-inch print settings and full Error Diffusion settings on your printer. For original 4K video footage, you can print up to 8x10 and have it look good!

Give it a try!

I DEFINITELY know what I'm doing when it comes to print settings and image capture!

V
Well, I've got my 20,000 grain bag of salt ready, and found your reply to be quite interesting. But why was it so short? - I was expecting something longer with more details! :ROFLMAO:

I happen to be the old school stills photographer, with an emphasis on landscapes especially, plus portraits, birds, and high magnification flowers&insects, who hasn't wanted to get into video much. The recent higher-res elevated landscape videos with drones, the R5 video talk, and your video-to-stills work has got me interested in getting into video, too. I am planning on getting the R5, with RF 15-35 f2.8 and RF 70-200 f2.8 initially. When I get it, I'll grab my bag of salt and give your suggestions a try and see what it's 8K video can do. Maybe this old dog can learn a new trick, after all. :cool:
 
Last edited:
Upvote 0
Well, I've got my 20,000 grain bag of salt ready, and found your reply to be quite interesting. But why was it so short? - I was expecting something longer with more details! :cool:

I happen to be the old school stills photographer, with an emphasis on landscapes especially, plus portraits, birds, and high magnification flowers&insects, who hasn't wanted to get into video much. The recent higher-res elevated landscape videos with drones, the R5 video talk, and your video-to-stills work has got me interested in getting into video, too. I am planning on getting the R5, with RF 15-35 f2.8 and RF 70-200 f2.8 initially. When I get it, I'll grab my bag of salt and give your suggestions a try and see what it's 8K video can do. Maybe this old dog can learn a new trick, after all. :cool:


---

I've previously been using the Canon C700 DCI 4K Global Shutter and the C700 FF for Video-to-Stills work and it's been AWESOME !!!

I usually shoot RAW VIDEO at 24 fps and 60 fps for best colour reproduction and the least noise but ANY modern DSLR and Mirrorless camera will work in video mode at 24 fps minimum up to 120 fps to get you pretty great stills for web-work and for inclusion into PDF files. The KEY PART is to shoot at a high colour depth and bitrate or you can shoot in FULL RAW mode and then when you're done your colour grading to MAKE SURE you export from your video editor's timeline the frames as UNCOMPRESSED STILL images such as in PNG or BMP format.

Goto Youtube or Vimeo and download a high quality landscape style 4K video file and see what you get when you try my suggestions. Try and PRINT a frame or two at 8x10 too so you can see what type of image you get!

V
--
 
  • Like
Reactions: 1 user
Upvote 0

justaCanonuser

Grab your camera, go out and shoot!
Feb 12, 2014
1,016
913
Frankfurt, Germany
I still am amazed that Canon obviously has solved the 8k vid heating problem that comes with such a compact body, and with IBIS - which means weaker heat links to the camera's whole body. I remember I have seen some years ago somewhere on the net an image of one of Canon's first experimental 8k cameras back then, which had a big camera body and a massive cooling system.
 
Last edited:
  • Like
Reactions: 1 user
Upvote 0
I still am amazed that Canon obviously has solved the 8k vid heating problem that comes with such a compact body, and with IBIS - which means weaker heat links to the camera's whole body. I remember I have seen some years ago somewhere on the net an image of one of Canon's first experimental 8k cameras back then, which had a big camera body and a massive cooling system.
It's certainly impressive, but we don't yet know what sort of recording time limit the camera will have. If it's at least 5 minutes that would be fine for my usage..
 
Upvote 0

usern4cr

R5
CR Pro
Sep 2, 2018
1,376
2,308
Kentucky, USA
I guess "animal AF" will be a very useful feature to get some politicians perfectly in focus :devilish:
This has to be the most hilarious, yet poignant, response I've ever seen! :ROFLMAO:
We're not supposed to get political here, so I'll just have to "bite my tongue"! - OUCH!!!
 
Last edited:
Upvote 0
The “are your hands small” comment isn’t necessary. Not everyone likes larger cameras. Way back, my Kodak tech rep had a Olympus Pen F. He was 6 foot three, and had large hands. He just liked a small camera.

Unless one is suffering from some sort of an insecurity complex about his misguided definition of his masculinity, there is nothing wrong about having small hands or someone suggesting you do.

I used a 1D ii for many years, and when I scaled down to an RP, I had some difficulty adjusting to this small camera, but in the same time, I enjoyed the reduced weight on my hip when moving around with the camera attached to my belt and the sudden added space in my camera bag. A small camera attracts less attention then a big one, obviously, and that can sometimes be useful: it's less difficult for me to hide in the crowd, but still, it's never easy.

I hope Canon will make a real battery grip for the R5 and, why not, for the RP and all the other Rs!

I'm sorry about my limited language proficiency, english is not my native tongue.
 
Upvote 0

SteveC

R5
CR Pro
Sep 3, 2019
2,678
2,592
This has to be the most hilarious, yet poignant, response I've ever seen! :ROFLMAO:
We're not supposed to get political here, so I'll just have to "bite my tongue"! - OUCH!!!

I think everyone can agree that some politicians are subhumans.

It doesn't get ugly until you argue about which ones.
 
  • Like
Reactions: 1 user
Upvote 0

TAF

CR Pro
Feb 26, 2012
491
158
---

Well ... If I was a Wiseguy, I'd be saying Ya Gotta Keep QUIET about all my previous posts !!!! Omerta! Capiche? ;-) :) ;-)

... OR ....

you could just take EVERYTHING I say with 20,000 grains of salt!

THIS IS THE INTERNET AFTER ALL AND I AM A CAT TYPING AWAY AT MY LONESOME KEYBOARD !!!

V


But are you THE cat that Canon used to evaluate the new cat identification software in the R5?
 
Upvote 0

YuengLinger

Print the ones you love.
CR Pro
Dec 20, 2012
3,739
2,255
USA
I would have preferred a photos without a lens mounted to the camera. Am I right that the R5 has a depth control button on the front whereas the R and RP don‘t have one?
You can assign various buttons on the R for DoF. I found the location of the 5D dedicated ones way too awkward; plus, of course, the VF became too dark. So I rarely bothered. Now with the R, I use it frequently. So clear and convenient!
 
  • Like
Reactions: 1 user
Upvote 0

koenkooi

CR Pro
Feb 25, 2015
3,543
4,081
The Netherlands
You can assign various buttons on the R for DoF. I found the location of the 5D dedicated ones way too awkward; plus, of course, the VF became too dark. So I rarely bothered. Now with the R, I use it frequently. So clear and convenient!

Especially for macro when you have a flash and exposure simulation enabled. Press the button and you'll see the DoF without it going extremely dark!
 
  • Like
Reactions: 1 user
Upvote 0