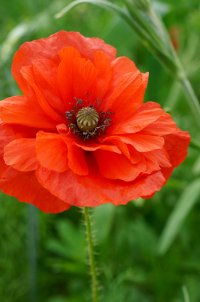
How do reds come out in your 5d3 ?

O.K. sensor experts, help me out here... In film days it was well understood that flowers were difficult to photograph due to the fact they reflect a spectrum of colors well outside what humans can see. Film was calibrated to represent the human visible spectrum as accurately as possible; but, often would misrepresent flower colors due to high IR and/or UV content. The solution was the use of various filters to attempt to compensate. Obviously there was no good way to play with the various color channels of the film.

With digital sensors we can play with the color channels but are constrained by the manufacturer's IR filter (obviously with some exceptions). Can anyone point me to a source that discusses the science of flower photography with digital sensors? What frequencies need to be maintained/eliminated to get good representation with which basic sensors? I sense that some sensors/cameras might well work better than others. Or, is it just a matter of having enough PP skill and experience to get it right?
 
Upvote 0
LightRoom tip: While holding down the alt key you can adjust the Whites the screen will turn completely white unless a channel is at 100%. If you see any black, that indicates pure white. If you see any other color, it indicates that channel is 100%. In your case with the Red flowers you will see large patches of red indicating that the red channel is at 100%. Back down the white slider until the last bit of red disappears and there is only one or two pixels that are at 100%. This will allow your flowers to have detail in the red.

notes while holding down alt key and adjusting whites:
Yellow = Red 100%, Green 100%
Purple = Red 100%, Blue 100%
Cyan = Blue 100%, Green 100%
Red = Red 100%
Green = 100%
Blue = 100%
Black = Red 100%, Green 100%, Blue 100%

Adjusting the Blacks works in a similar manor.

-T
 
Upvote 0
old-pr-pix said:
O.K. sensor experts, help me out here... In film days it was well understood that flowers were difficult to photograph due to the fact they reflect a spectrum of colors well outside what humans can see. Film was calibrated to represent the human visible spectrum as accurately as possible; but, often would misrepresent flower colors due to high IR and/or UV content. The solution was the use of various filters to attempt to compensate. Obviously there was no good way to play with the various color channels of the film.

With digital sensors we can play with the color channels but are constrained by the manufacturer's IR filter (obviously with some exceptions). Can anyone point me to a source that discusses the science of flower photography with digital sensors? What frequencies need to be maintained/eliminated to get good representation with which basic sensors? I sense that some sensors/cameras might well work better than others. Or, is it just a matter of having enough PP skill and experience to get it right?
I can't help you with the science of it all, but I wouldn't recommend filters with digital. Canon's sensors tend to be slightly biased toward saturated reds and the way I shoot flowers is to make sure I'm in the RGB Histogram mode for image review. If I see clipping in any of the channels, particularly on the shadow side, I will increase or reduce the exposure compensation to get a good exposure. In post, the single best tool I've found to process flower photos is DxO. It has a "Protect Saturated Colors" tool (see #4 towards the bottom of this tutorial page) specifically for this situation. The auto mode is a little too aggressive, but the slider works extremely well. You can do similar things in PS/LR with ACR, but it's not as simple. DxO's tool makes it so easy.
 
Upvote 0

ahsanford

Particular Member
Aug 16, 2012
8,620
1,651
Excellent thread. This topic has vexed me on 5D3 flower work. The 5D3 has always been oversaturated on reds in my hands, and I seem to lose something when I try to rein in the reds in RAW processing.

I don't want a great post-processing tool for this specific issue. More commentary on in-camera work, please. How do I preview this is going to happen, and when I find it, how do I compensate for it?

Keep talking, people.

- A
 
Upvote 0
jrista said:
What do you think of this?

ohlW8ss.jpg


I chose the "Camera Faithful" profile under Camera Calibration. The settings can be seen in this before/after comparison:

qyo4vH9.gif

Certainly improved over the unprocessed RAW, but still not fully detailed. I can much around the whites and blacks only and get it to where I want it, my issue is, why do I have to much around with it anyway. Is there an in body setting or LR profile I can use?

I think McGyver has some good ideas too.... the blues and yellows might be the issue and in trying to fix those, the raw converter over saturates the reds.

I tried the alt+white or black slider trick and while is made the reds better, the rest of the photo became unappealing.

I like my rendition (3rd shot) where I reduced both black and whites... and show the LR settings

Great discussion guys.
 
Upvote 0
K-amps said:
Certainly improved over the unprocessed RAW, but still not fully detailed.

Actually, the flower is fully detailed, for what detail was preserved in the RAW. That's why I posted the closeup...all the detail is there. The only additional thing you could do is adjust brightness or saturation further, or shift the hue...all of which will have the effect of reducing the impact of the reds overall.

I think what your looking for now is enhancing the subtle variations in the detail. That is where microcontrast and sharpening come into play...but that is a different discussion than restoring over-saturated colors.

Here is an image that has been sharpened:

vJ8UGGJ.jpg


K-amps said:
I can much around the whites and blacks only and get it to where I want it, my issue is, why do I have to much around with it anyway. Is there an in body setting or LR profile I can use?

I think McGyver has some good ideas too.... the blues and yellows might be the issue and in trying to fix those, the raw converter over saturates the reds.

I tried the alt+white or black slider trick and while is made the reds better, the rest of the photo became unappealing.

I like my rendition (3rd shot) where I reduced both black and whites... and show the LR settings

Do you mean where you reduced the brightness and contrast of the image overall?
 
Upvote 0
.
I don't have a solution, but I do know the problem well.

1. I simply spend a lot of time in post tweaking things until they're acceptable, if I can get them there. Frankly, at this point I'm leery of red flowers. Thanks, McG, that's a great tip about watching the red in histogram and going against the grain, so to speak.

2. I don't think the OP could have picked a worse lens -- in my experience the 85 1.2 LII is as bad as it gets. (It's a spectacular lens for what it does best, but it's the worst with this red issue.)

3. You could try a Fuji sensor. Working with the colors I get from my X100S has been a pleasure I seldom find with the 5D3. (And I shoot only RAW all the time.)
 
Upvote 0
K-amps said:
I have often struggled with red objects in my 5d3. I wrote last year about it but did not get any replies. Yesterday while trying out my new 85 1.2 ii, I saw the same issue.

Red flowers come out in an over saturated red haze. The other colors seem saturated just fine, but the reds are over powered so much that the flowers lose detail.

I can reduced saturation in LR, but then the whole image looks washed out... the issue is only with reds.

If I reduce just red (Red channel only) , then it lacks punch, although I get back details in the flower...

Has anyone else observed this?

Looks like your auto white balance is thrown off by the amount of 'green' in the photo (greens look too blue). Try a WB setting of 'daylight' or 'cloudy'. I find this gives the best overall results if shooting in a 'green' environment.
 
Upvote 0
Jul 14, 2012
910
7
ahsanford said:
Excellent thread. This topic has vexed me on 5D3 flower work. The 5D3 has always been oversaturated on reds in my hands, and I seem to lose something when I try to rein in the reds in RAW processing.

You and others single out the 5DIII, but I'm pretty sure I've had the same problem with all the Canon cameras I own or have used (5DII and more recent models, both FF and APS-C). Is that true for you too? (I also find a related issue: even if I get reds to look right in LR, the process of exporting it to JPEG often screws up the results). For a while I more-or-less gave up photographing red flowers....

Other cameras I use/have used seem to treat red as a problem and understate it, at least when it's a component of other colours. The first time I photographed purple petunias with my Pentax K5 (I no longer own it), they came out almost pure blue, while my two Sonys (FF & APSC) do something similar, though not to the same extent (it may not be a Sony sensor thing - I'm pretty sure my OM-D doesn't do this, but it, like the K5, has a Sony sensor); so instead of taming reds I end up adding a bit of red to the purple tone in LR.
 
Upvote 0
A couple of follow ups on the replies:

K-amps, that does look much better and I like Jon's version as well, with the sharpening.

As far as in-camera work goes, to get the best exposure (and negative/CR2 file) here's what I've had success doing:

1. Starting with the light, shoot in good, soft light, or use a 1 or 2 stop diffuser if the light is harsh. Extremes of dynamic range (DR) and saturated colors don't make for a good match. A reflector can be a nice fill as well.

To get a useful histogram, do the following:

2. Set the white balance manually - if outdoors, use Sun, Shade, or Cloudy, or calibrate to a white card. If indoors, calibrate to your lights.

3. Set the Picture Style to Neutral if outdoors, or Faithful if using lights at 5200K.

4. From here, I generally use Evaluative metering, but Spot works well, too, especially for single flowers.

5. Compose, focus, and take a shot with exposure compensation set to zero.

6. In Play back mode, press the Info button until you see both the R-G-B and Brightness histograms. The standard Brightness histogram is all but useless for flowers or other saturated colors.

7. Check for clipped (i.e. spiked at the far right or far left) channels.

8. If the shadows (left) side of the R, G, or B are clipped, raise the exposure in 1/3 EV increments and repeat the shot until the clipping is gone.

9. It's a good idea to have the Highlight Alert turned on as well to make sure you don't blow out the highlights. Sometimes you'll have to find a good balance, but don't be afraid to blow out the highlights a bit (1/3 to 1/2 EV) to (un)clip the shadows.

This process should give you the best "digital negative" for post processing. If shooting JPEG or if you don't intend to do any post work, you might want to switch back to Standard or Landscape Picture Styles and drop the exposure compensation about 1/2 EV for more saturated colors.
---------
Also, I agree with distant.star on the 85L II - it's a portrait lens and tends to run warmer than many of the other Canon lenses. The 100L macro and 180L macro are the best I've used, but all of the macro lenses, from any manufacturer all take excellent photos.

For some reason this part didn't come up in the post above:

I'm also going to post a link to a gallery from one of my photo books that focuses on flowers:
In Bloom: Alfred B. Maclay Gardens State Park

If you have specific questions about how I took any of the photos, feel free to ask, and I'll leave you with the two flowers that I found most difficult to capture/process - both shot with the 5DIII and 180L macro:

China Pink (Dianthus chinensis) - trying to hold detail in this flower with the most intense red I've ever seen was tough:
_H2B2942_DxO-L.jpg


'Rosea Superba' camellia (Camellia japonica) - the high dynamic range and pretty much pure red flower really challenged the sensor:
_H2B2544_DxO-L.jpg
 
Upvote 0

ahsanford

Particular Member
Aug 16, 2012
8,620
1,651
mrsfotografie said:
K-amps said:
I have often struggled with red objects in my 5d3. I wrote last year about it but did not get any replies. Yesterday while trying out my new 85 1.2 ii, I saw the same issue.

Red flowers come out in an over saturated red haze. The other colors seem saturated just fine, but the reds are over powered so much that the flowers lose detail.

I can reduced saturation in LR, but then the whole image looks washed out... the issue is only with reds.

If I reduce just red (Red channel only) , then it lacks punch, although I get back details in the flower...

Has anyone else observed this?

Looks like your auto white balance is thrown off by the amount of 'green' in the photo (greens look too blue). Try a WB setting of 'daylight' or 'cloudy'. I find this gives the best overall results if shooting in a 'green' environment.

Good tip, but I've seen this even 'as shot' from my RAW processing in ACR. I clip on my reds all the time, and tweaking the WB isn't doing it for me. I end up having to toy with sliders for saturation and (a) waste time doing that and (b) never like the output when I do.

This also isn't limited to strong green backgrounds being a trigger. I've seen this happen on anything with a strong field of red in the frame regardless of background. I am talking about the RAW file and not about picture-style related saturation effects with onboard JPGs.

I'm not a pro. I like to keep my RAW processing time down to around 60-120s per shot, so color is one of the things I would prefer to get right in-camera and only need to run global saturation/luminance changes on in RAW processing. There has got to be a way to manange this in-camera before you clip.

Mackguyver's suggestion (see page 2 of this thread) to use multi-color histo and avoid clipping the shadows is interesting and will be tried out. Is exposure only a global adjustment for auto exposure modes? Is there anyway to run auto-exposure independently for R, G and B? I'm getting a headache thinking about how that would not work -- colors would shift, the metering may not work that way, etc. -- but please sate my curiosity and tell me anyway. :D

- A
 
Upvote 0
ahsanford said:
Is exposure only a global adjustment for auto exposure modes? Is there anyway to run auto-exposure independently for R, G and B? I'm getting a headache thinking about how that would not work -- colors would shift, the metering may not work that way, etc. -- but please sate my curiosity and tell me anyway. :D

- A
Exposure is exposure (shutter speed vs. ISO speed vs. aperture), and affects all channels, and there is no way to adjust one over the other. They are not affected equally (but don't worry about trying to get into all of that as it's not helpful).

The key things to understand are that RAW files are recorded in a logarithmic manner and the highlights contain a lot of detail (in terms of data) while the shadows do not. If you clip the highlights completely, the data is gone, but if you are near the clipping (i.e. Expose to the Right), it's easy to recover. If you clip the shadows, it's totally gone and if your photo is underexposed, the detail that you can recover is mushy and noisy.

So the idea is to get the data towards the right without clipping any of the channels completely (though a few small "blinkies" are okay), especially with flowers or other saturated color objects. To do this, you MUST have an accurate histogram and White Balance has a huge effect on the accuracy. The closer the WB is to the conditions, the more accurate the histogram.

The resulting photo will look overexposed, but when you take it into a RAW processor and drop the exposure a stop or so, the photo will look perfect and you have lots of detail. Plus, the shadows (i.e. saturated colors here) will also have more detail and latitude in terms of exposure and color adjustments.
 
Upvote 0
mackguyver said:
ahsanford said:
Is exposure only a global adjustment for auto exposure modes? Is there anyway to run auto-exposure independently for R, G and B? I'm getting a headache thinking about how that would not work -- colors would shift, the metering may not work that way, etc. -- but please sate my curiosity and tell me anyway. :D

- A
Exposure is exposure (shutter speed vs. ISO speed vs. aperture), and affects all channels, and there is no way to adjust one over the other. They are not affected equally (but don't worry about trying to get into all of that as it's not helpful).

Actually, exposure is JUST related to shutter speed and aperture. ISO is not really an exposure factor...it simply amplifies the signal that the exposure creates.

mackguyver said:
The key things to understand are that RAW files are recorded in a logarithmic manner and the highlights contain a lot of detail (in terms of data) while the shadows do not. If you clip the highlights completely, the data is gone, but if you are near the clipping (i.e. Expose to the Right), it's easy to recover. If you clip the shadows, it's totally gone and if your photo is underexposed, the detail that you can recover is mushy and noisy.

This is also fundamentally wrong. RAW data is recorded linear. Trust me on this...I do astrophotography, with DSLRs, and the linearity of the data is absolutely critical to being able to process the data correctly. In PixInsight, the processing procedurs are also usually split, between processing in linear mode, and processing in non-linear (post-stretch) mode.

The non-linearity of what we see in a tool like Lightroom has everything to do with the tool, NOT the data. The data is linear, it is rendered to the screen via non-linear tone curves, and non-linear processing.

mackguyver said:
So the idea is to get the data towards the right without clipping any of the channels completely (though a few small "blinkies" are okay), especially with flowers or other saturated color objects. To do this, you MUST have an accurate histogram and White Balance has a huge effect on the accuracy. The closer the WB is to the conditions, the more accurate the histogram.

You can expose to the right right up to the clipping point. Since the data IS linear in a RAW file, if you expose your red channel to 2^14 - 1, then your right at, but not over, the clipping point. You will not have lost anything.

The in-camera histograms are usually based off of JPEG thumbnails, which are actually highly inaccurate. This is why some people use UniWB, to change the per-channel weighting, and force the JPEGs that the histograms are based on to more accurately reflect the real dynamic range and clipping point of each channel.

Without UniWB, you can usually expose a little more than the in-camera histogram and "blinkies" would lead you to believe.

mackguyver said:
The resulting photo will look overexposed, but when you take it into a RAW processor and drop the exposure a stop or so, the photo will look perfect and you have lots of detail. Plus, the shadows (i.e. saturated colors here) will also have more detail and latitude in terms of exposure and color adjustments.

There is one caveat...there is a very slight non-linearity to the response of the silicon in the sensor itself. That usually results in the uppermost levels near the clipping point tapering off in a small shoulder. It's best not to push exposure right up to the limit...i.e. 2^14-1. You want to keep your maximum levels just a little lower than that...2^14-10 or so is best. Otherwise, you'll notice that the highlights in those regions end up normalizing, becoming gray. You also start noticing very slight color shifts when you recover highlights that are right near the clipping point, as the processing algorithms are non-linear, and they will affect those upper upper highlights more than any other part of the signal.

Dropping the exposure by a stop or two is extreme. You want to ETTR, to maximize your use of the sensor's DR, but you don't want to push it too far. I'd say once you figure out where your real clipping point is, pull back by a third of a stop.
 
Upvote 0

ahsanford

Particular Member
Aug 16, 2012
8,620
1,651
Annnnnnd this is why I'm not a pro.

Mackguyver: ETTR is not new to me at all, I've been doing that for some time. That principal is well in-hand for me.

But if I understood your and Jrista's posts correctly, I just learned that my in-camera WB does affect my RAW files due to its effect on metering. That's a big deal for me, as I shoot everything in AWB and JPG+RAW, and I simply correct the white balance in my keeper RAW files.

So now I do need to sweat my WB. I always thought that RAW alleviated me of that burden and I just focused on a general (non-color-specific) histo.

- A
 
Upvote 0
ahsanford said:
Annnnnnd this is why I'm not a pro.

Mackguyver: ETTR is not new to me at all, I've been doing that for some time. That principal is well in-hand for me.

But if I understood your and Jrista's posts correctly, I just learned that my in-camera WB does affect my RAW files due to its effect on metering. That's a big deal for me, as I shoot everything in AWB as JPG+RAW and simply correct the white balance in my keeper RAW files.

So now I do need to sweat my WB. I always thought that RAW alleviated me of that burden and I just focused on a general (non-color-specific) histo.

- A
Sorry for the confusion, but fortunately this is a pretty simple one. For most things, auto WB is okay and gives a pretty good histogram...but if you're shooting deeply saturated colors, during golden hour or blue hour, snow, under indoor lighting, or anywhere else that throws the WB off significantly, it will affect the histogram, making ETTR and other exposure tweaks hard to see in the histogram.

I leave my histogram on the general Brightness view most of the time, but for deeply saturated colors, the general Brightness histogram hides the clipped color channels because it averages all three channels and if the red channel is near 0, then 0 + 255 + 255 / = 170, which looks 2/3 of the way up, but not clipped.

Takeaway: most of the time, Auto WB (or Sunlight if outdoors) works pretty well, but for situations that throw it off, manual WB is best, and Custom WB is very best for critical (i.e. paid) shoots, at least for a good histogram.
 
Upvote 0
ahsanford said:
Annnnnnd this is why I'm not a pro.

Mackguyver: ETTR is not new to me at all, I've been doing that for some time. That principal is well in-hand for me.

But if I understood your and Jrista's posts correctly, I just learned that my in-camera WB does affect my RAW files due to its effect on metering. That's a big deal for me, as I shoot everything in AWB and JPG+RAW, and I simply correct the white balance in my keeper RAW files.

So now I do need to sweat my WB. I always thought that RAW alleviated me of that burden and I just focused on a general (non-color-specific) histo.

- A

Absolutely, the in-camera WB has an effect on exposure. Also, I find the immediate results on the camera screen to give a better evaluation of what the end result will look like. I shoot AWB most of the time if there is enough color variation in the scene but in natural environments I find an approximation using cloudy/daylight/shade works best. That approximation is good enough to tweak in post if needed.

I am technical about my photography but don't want to turn it into a science. So a few clipped channels here and there are ok with me as long as the overall result is to my liking.

FWIW I'll join the red flower post ;D

Here's one shot with my NEX-6 and a Canon 50mm f/3.5 FL Macro (from the 60's).
 

Attachments

  • 2014_07_20_0139.jpg
    2014_07_20_0139.jpg
    293 KB · Views: 634
Upvote 0
mackguyver said:
mrsfotografie said:
Absolutely, the in-camera WB has an effect on exposure.
Nice photo MRS! I would like to clarify what you said above - it has an effect on the exposure of JPEGs and histograms, but zero affect on the exposure itself in RAW, and it does not affect the metering.

Actually yes you're right but because it affects the histogram I think it better helps to evaluate if exposure is correct based om the output/clipping of the individual channels in the histogram. I always have my histogram showing in image review, set to RGB. In fact. being able to see the histogram is almost more important than being able to see the shots themselves.

Maybe it's the correct exposure for dynamic range per channel that counts, if something like that actually exists.
 
Upvote 0
ahsanford said:
Annnnnnd this is why I'm not a pro.

Mackguyver: ETTR is not new to me at all, I've been doing that for some time. That principal is well in-hand for me.

But if I understood your and Jrista's posts correctly, I just learned that my in-camera WB does affect my RAW files due to its effect on metering. That's a big deal for me, as I shoot everything in AWB and JPG+RAW, and I simply correct the white balance in my keeper RAW files.

So now I do need to sweat my WB. I always thought that RAW alleviated me of that burden and I just focused on a general (non-color-specific) histo.

Yes, metering can affect the exposure, especially in cameras that use some kind of color metering (which includes most of Canon's higher end models, most of Nikon's cameras, etc.) Color metering, especially metering that aims to prevent clipping, can definitely result in underexposure of one or two channels, while another is right at the limit. Auto WB can help with that, however it often results in inconsistent white balance frame to frame, so manually picking a good WB setting (and that does not necessarily mean using one of the built-ins...you can often choose by Kelvin or simply create a custom profile from a sample shot of a scene) is often critical to getting balanced color.
 
Upvote 0

DominoDude

Certified photon catcher
Feb 7, 2013
910
2
::1
Sorry that I'm not of much help regarding the colours on the 5D Mk III and what it looks like in Lr, but from a tip that I've gotten regarding histograms and the jpg you can see on the screen of your cameras, it will be easier to see the correct balance between colours with a Picture Style set to Faithful (or Neutral).

I have no idea if Lr ignores that extra layer of information from the Picture Style while rendering files from RAW, or if gets to be some kind of starting point for the balance of colours in Lr.

If this doesn't apply to you and your shooting, then just ignore my mumbling...
 
Upvote 0