Canon EOS R5 Mark II going to 60mp? [CR1]

No, I said the lower bits are noise. I didn't say that there were no noise at all in the higher bits.
That's still incorrect as long as you were referring to the shot noise.
Won't work, unless by "noise reduction" you mean something other than a photographer would mean.
Of course it won't work - because the noise is inseparable from the signal. You don't remove it and don't reduce it by stripping the lowest bits.
What else would you expect to extract from those bits, and how?
Those bits are a part of the signal. I'd expect to extract the shadow detail from those bits.
 
Upvote 0
Mar 26, 2014
1,443
536
I think if Canon gives us the control on pixels, then it could be better; for instances:
1- An option to shoot at 60mp, 46mp, 30mp and 16mp.
Canon allows taking photos at lower resolutions, both video and stills.
2- Cleaner images on long exposure/low light
3- Continously video shooting with no over heating
How is that pixel control?
4- 4k/240p and 8k/180 or 240
How is that pixel control?

And just for fun - how are you going to record 8k/240 video?
 
Upvote 0
Sep 20, 2020
3,167
2,461
No, I said the lower bits are noise. I didn't say that there were no noise at all in the higher bits.


Won't work, unless by "noise reduction" you mean something other than a photographer would mean.


What else would you expect to extract from those bits, and how?
I think we are splitting hairs here.
It is not "nothing but noise".
It is too much noise to be useable.
They are practically the same thing for all intents and purposes but are not exactly the same thing.
 
Upvote 0

AlanF

Desperately seeking birds
CR Pro
Aug 16, 2012
12,444
22,881
5DSR had same cRaw - and it would shoot faster if you used it.
I shot the 5DSR for several years and can assure you it didn't have it. C-RAW was introduced along with .CR3. The 5DSR had .CR2. The "medium" (M-RAW) and "small" (S-RAW) files on the 5DSR are lower resolution formats, unlike C-RAW that has full resolution.

"The DIGIC 8 processor enabled a .CR3 file format, with a C-RAW option that captures the same resolution but produces 35–55% smaller files, saving storage space on your memory card. (To do this, however, C-RAW uses lossy compression – that is, it discards some image information. More about this shortly.)"
 
  • Like
Reactions: 1 user
Upvote 0
  • Like
Reactions: 3 users
Upvote 0

AlanF

Desperately seeking birds
CR Pro
Aug 16, 2012
12,444
22,881
  • Like
Reactions: 1 users
Upvote 0
Thanks for that. Could someone please explain it in simple language that even I could understand.
In short, very roughly, they don't compress pixel values directly, they apply a special transformation (wavelet transform) and then compress the coefficients from that transformation.

As to more detailed explanation, I haven't worked with image compression algorithms at this level.
However, very roughly, in craw, they compress RGB channels separately. For each channel, they apply so called wavelet transform, which produces discrete (integer) coefficients for each pixel. Those coefficients can be encoded/compressed more efficiently than the original pixel values, without losses (yet). Which means, one can recover the original pixel values from those coefficients.
Then they apply some lossy procedure on those coefficients to prepare them for better encoding. And then they do lossless encoding of the lossy coefficients.
To complicate things, they apply transformations on different subbands of the image as on that figure from https://github.com/lclevy/canon_cr3#c-raw-lossy, but I'm not sure how it all gets combined.
 
  • Like
Reactions: 3 users
Upvote 0

AlanF

Desperately seeking birds
CR Pro
Aug 16, 2012
12,444
22,881
In short, very roughly, they don't compress pixel values directly, they apply a special transformation (wavelet transform) and then compress the coefficients from that transformation.

As to more detailed explanation, I haven't worked with image compression algorithms at this level.
However, very roughly, in craw, they compress RGB channels separately. For each channel, they apply so called wavelet transform, which produces discrete (integer) coefficients for each pixel. Those coefficients can be encoded/compressed more efficiently than the original pixel values, without losses (yet). Which means, one can recover the original pixel values from those coefficients.
Then they apply some lossy procedure on those coefficients to prepare them for better encoding. And then they do lossless encoding of the lossy coefficients.
To complicate things, they apply transformations on different subbands of the image as on that figure from https://github.com/lclevy/canon_cr3#c-raw-lossy, but I'm not sure how it all gets combined.
Thanks - very much appreciated. For those wishing to follow up wavelets, here is an intro https://www.eecis.udel.edu/~amer/CISC651/IEEEwavelet.pdf
 
  • Like
Reactions: 1 users
Upvote 0

usern4cr

R5
CR Pro
Sep 2, 2018
1,376
2,308
Kentucky, USA
Thanks for that. Could someone please explain it in simple language that even I could understand.
This is the wavelet compression that I have found to be really good for extremely fast encoding/decoding of images. It was my #1 choice for image compression when I was doing game design. You first scan every left-right pair of pixels and replace them with their average and difference. If you have 50 and 70, then the average is 60 and the difference is +20, so you store 60 and +20 instead of 50 and 70. Store the 60 to the left half of the image and 20 to the right half of the image (the output is in a separate buffer, or "double buffer").

Next you do the same (with the other buffer), with 2 up-down pixels, for the entire image, storing the average to the top half and the difference to the bottom half. After that the upper left quarter of the image is the averaged image, the upper right has the "edge" or changing data left to right (for vertical lines). The lower left has changing data for horizontal lines, and the lower right has changing data for both (a lot of noise goes there).

This first "pass" has 1/4 size of the average image data (with less noise). The rest has "changing" data which is typically much smaller numbers (especially for smoothly changing images like the sky) so they can be stored with much less data needed (with run length encoding or whatever).

Now you can repeat this process for the upper left (averaged image) part to get 4 parts for it to reduce the output size further. Canon does it a 3rd time according to what this article shows (as I understand it).

This code can be done with massively large data (SIMD or single instruction multiple data) usage. The reverse process to decode the wavelet output to the original image is also fast with SIMD usage.

Canon apparently does this with the R, G and B channels separately so it preserves the "raw" nature of the image, which has not had the Bayer 4 element (RGGB) to 12 element RGB (RGB x 4) blending done. My previous work always started with RGB data per pixel, which I first converted into L (luminance) and 2 color channels via 3x3 matrix transform per pixel to get even better results. I think that it is brilliant that Canon has done this with Raw files to preserve their raw nature while reducing file size. In fact, you could have a "lossless" version of this technique if you store the exact data for all elements and you could still get a reduced file size for typical images. But this technique allows you to vary how much low-bit data you want to discard from the smoothed image versus the edge (or high frequency) image which can be tuned to get the best size reduction with the least amount of noticeable change to the viewer.
 
Last edited:
  • Like
  • Love
Reactions: 5 users
Upvote 0

AlanF

Desperately seeking birds
CR Pro
Aug 16, 2012
12,444
22,881
This is the wavelet compression that I have found to be really good for extremely fast encoding/decoding of images. It was my #1 choice for image compression when I was doing game design. You first scan every left-right pair of pixels and replace them with their average and difference. If you have 50 and 70, then the average is 60 and the difference is +20, so you store 60 and +20 instead of 50 and 70. Store the 60 to the left half of the image and 20 to the right half of the image (the output is in a separate buffer, or "double buffer").

Next you do the same (with the other buffer), with 2 up-down pixels, for the entire image, storing the average to the top half and the difference to the bottom half. After that the upper left quarter of the image is the averaged image, the upper right has the "edge" or changing data left to right (for vertical lines). The lower left has changing data for horizontal lines, and the lower right has changing data for both (a lot of noise goes there).

This first "pass" has 1/4 size of the average image data (with less noise). The rest has "changing" data which is typically much smaller numbers (especially for smoothly changing images like the sky) so they can be stored with much less data needed (with run length encoding or whatever).

Now you can repeat this process for the upper left (averaged image) part to get 4 parts for it to reduce the output size further. Canon does it a 3rd time according to what this article shows (as I understand it).

This code can be done with massively large data (SIMD or single instruction multiple data) usage. The reverse process to decode the wavelet output to the original image is also fast with SIMD usage.

Canon apparently does this with the R, G and B channels separately so it preserves the "raw" nature of the image, which has not had the Bayer 4 element (RGGB) to 12 element RGB (RGB x 4) blending done. My previous work always started with RGB data per pixel, which I first converted into L (luminance) and 2 color channels via 3x3 matrix transform per pixel to get even better results. I think that it is brilliant that Canon has done this with Raw files to preserve their raw nature while reducing file size. In fact, you could have a "lossless" version of this technique if you store the exact data for all elements and you could still get a reduced file size for typical images. But this technique allows you to discard more of the noise-prone low bits and less of the smoothed image-prone bits so that you can get even better size reduction without noticing it as much visually.
There are some really smart people in this forum.
 
  • Like
Reactions: 2 users
Upvote 0

usern4cr

R5
CR Pro
Sep 2, 2018
1,376
2,308
Kentucky, USA
There are some really smart people in this forum.
Well, this just happened to be at one of the hearts of my profession, back when I got paid to do it. I remember reading a book on fractal image compression, and wrote code to do an improved version of it. I could get results of up to 50:1 size reduction in black and white images without noticing too much change in the image (in our fairly smooth test image). The author, who I contacted and corresponded with, asked me if he could use my techniques in his next book (which was fine by me). This "self similar" technique existed solely to encode a particular rectangular area of an image with scale (multiply) and offset (add/subtract) values to output it into a smaller (it MUST be smaller) rectangle somewhere else in the outputimage (again, with double buffers). For example, part of the the curve of a branch could be stored in another area that had smaller brances of similar orientation. All areas of the entire output image must be created from their larger source image somewhere else (or nearby). The hard part was to look at the image to see which areas could be compressed into other areas. That was so difficult to do that it could take minutes or up to several hours for a single image (depending on how many combinations of source & destination parts you wanted to try). But once you found the right encoding, you could "recreate" the image by applying a pass to any (yes, ANY) image (but typically a solid gray one for example). That would change the image to something that looked a "little" like the final result. Then repeat more passes on the resultant image until you get an image that no longer changes, and voila - you have your decoded image. The decoding was fast enough (other than the fact that it usually needed 10 passes), but the encoding was sooooo long that you could forget about it for real-time encoding uses. Using this result, you could even increase the size of the output image to a larger version than the original image and get more detail that looked remarkably realistic (smooth edges of an orange and someone's face, or different size twigs in a tree for example).

Oh, and the "test" image we used for compression was a portrait picture of "Lena", which was a staple of research in image compression. I only found out later that this portrait was a crop of Lena from her Playboy centerfold. And that gives you an idea of the type of guys (well, mostly) that comprised the early game design industry! ;)
 
Last edited:
  • Like
Reactions: 3 users
Upvote 0
Jul 21, 2010
31,228
13,089
How are you going with your underwater shooting?
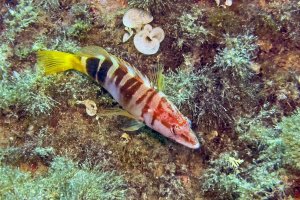
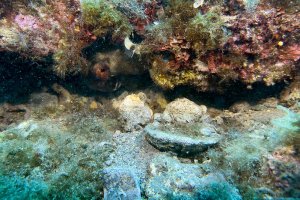
Here are a couple of shots from the dives near Taormina, Sicily. Taken with an iPhone 14 Pro in a Sealife SportDiver Housing, illuminated by a pair of SeaLife Sea Dragon Pro Dual Beam floods.

"Painted Comber"
Painted Comber.jpg

"Octopus Eye"
Octopus Eye.jpg
 
  • Like
Reactions: 6 users
Upvote 0
Here are a couple of shots from the dives near Taormina, Sicily. Taken with an iPhone 14 Pro in a Sealife SportDiver Housing, illuminated by a pair of SeaLife Sea Dragon Pro Dual Beam floods.

"Painted Comber"

"Octopus Eye"
View attachment 210316
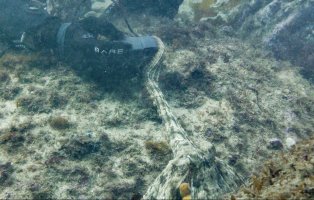
Nice... always good to find critters to play with... With octopus, you can use your finger (preferably with no glove) to lightly touch the sand/rock in front of it... like scratching it. The octopus will extend a tentacle to explore and touch you.
If it puts 2 tentacles out, then it wants to hold you. If you resist and it will come out but may wrap around your camera/hand... it will give it back to you (eventually) but can be unnerving the first time. They can be surprisingly strong especially the larger ones but makes great video :)

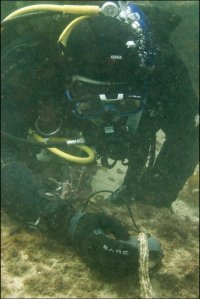
The vis was particularly poor in Sydney this day... but you get the idea. 2 images as I was shooting "macro" with my 100mm. I always allow full focal range in case of situations like this.

If you do the Padi photography course, the main thing is to get low (or slight under) and shoot up. Your strobes/torch can light the subject up from underneath. It gives a more pleasing composition to be head on rather than a "record" shot of the subject. Not always easy to do especially not touching coral. A "reef stick" can help to use as a "monopod" to keep you in place whilst shooting. Adjusting your buoyancy by removing air from your BCD to drop down on sand/rock helps. If you are well weighted then breathing out will enable you to drop down. Take the shot when you stop breathing out (hold if possible) rather than holding your breath after breathing in.
Apart from that, the course talks about light direction etc which is pretty basic for people used to shooting above water.

Screenshot 2023-07-24 at 9.00.17 am.jpg

Screenshot 2023-07-24 at 9.00.08 am.jpg
 
Last edited:
  • Like
Reactions: 3 users
Upvote 0
This is the wavelet compression that I have found to be really good for extremely fast encoding/decoding of images.... This code can be done with massively large data (SIMD or single instruction multiple data) usage. The reverse process to decode the wavelet output to the original image is also fast with SIMD usage.
Excellent explanation :)
I am amazed that the process can be fast!
Canon apparently does this with the R, G and B channels separately so it preserves the "raw" nature of the image, which has not had the Bayer 4 element (RGGB) to 12 element RGB (RGB x 4) blending done. My previous work always started with RGB data per pixel, which I first converted into L (luminance) and 2 color channels via 3x3 matrix transform per pixel to get even better results. I think that it is brilliant that Canon has done this with Raw files to preserve their raw nature while reducing file size. In fact, you could have a "lossless" version of this technique if you store the exact data for all elements and you could still get a reduced file size for typical images. But this technique allows you to vary how much low-bit data you want to discard from the smoothed image versus the edge (or high frequency) image which can be tuned to get the best size reduction with the least amount of noticeable change to the viewer.
It would be even better to have a lossless or lossey option!
I wonder if Canon patented for their implementation or could it be open source?
That said, the heif container was standardised in 2015 (apple adopted it in 2017) but hasn't really been adopted outside of the Apple ecosystem which is disappointing.
 
  • Like
Reactions: 1 user
Upvote 0

cayenne

CR Pro
Mar 28, 2012
2,866
795
I wholeheartedly agree with this. As much as I enjoy my r3, r5 and r5c as professional workhorses they are not an every-day carry item. Nothing could ever replace big professional heavy glass like an 85 1.2 but I am quite desperate for something refreshed and truly pocketable that bridges the gap between an iPhone and a pro level camera like the G5X Mk II.
Maybe get a Leica Q2 or the newer Q3 for high quality portability...?
 
Upvote 0